This morning I wanted to send a message to those students in my class who hadn’t yet submitted the first homework assignment at Moodle.
A little Googling led to this solution. It requires several steps, but I found it easy once I put it all together. You can see the process from start to finish in this 1-minute video, or scroll past it to see the step-by-step with screenshots.
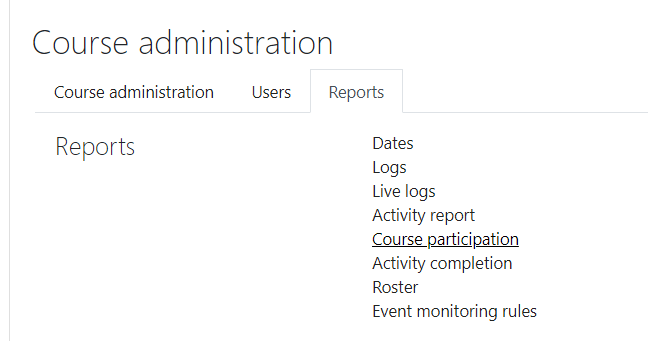
Find your way to “Reports” and “Course Participation”
From the Gear Menu, Select “More” then “Reports” and finally “Course Administration”.
Select the activity and show “Post” actions
Select the activity from the dropdown menu, then specify only Students, and show actions Post. Hit Go
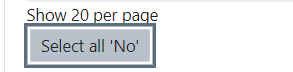
Ask Moodle to find the students who haven’t submitted the activity
Scroll to the bottom and “select all No”
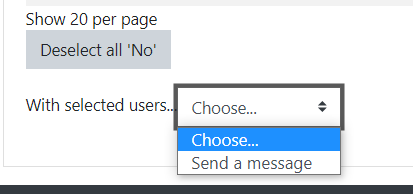
Select “Send a message”
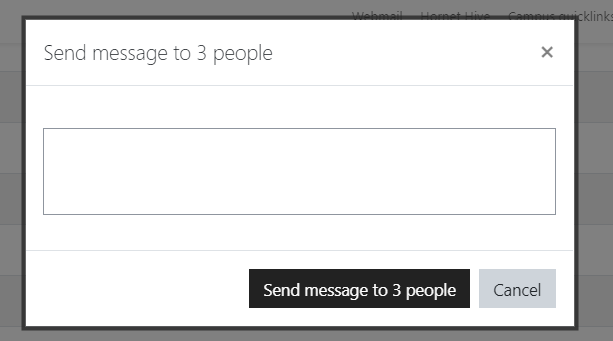
from the “With selected users…” menu, choose “Send a message”A text entry window pops up with a place to type the message. Hit “Send”
This sends a message to students within Moodle. The students should also receive an email alert.
I’ll admit: Prior to Fall 2020, I was never an LMS person. I was trained in a program that lived and died under King Syllabus, where you’d give your students a 15-page syllabus and that would serve as the longform compendium of all of the course’s worldly knowledge. But with the move to virtual learning, the online space of our classrooms suddenly became much more important, taking on jobs that syllabi do not typically do: Discussion forums, digital assignment submission, etc.
When we were invited to make use of our class’s Moodle page as a course “hub,” I realized that it could be something I’ve always fantasized about: A dedicated classroom. Stuff on the walls! Classroom stations! Those awesome daily schedule pocket charts!
Using our Moodle page as an active hub, rather than as a link repository, helped give Moodle a “classroom” feel, carving out a digital space that my students could comfortably make real use of.
Moodle as Home Base
First of all, special thanks to the 2020 Teaching and Learning Workshop for the strong example it set in Moodle usage! Much of what I discuss below is an extension of what I saw modeled there.
I wanted our Moodle page to be a place that my students could access anything they could possibly need for our class, as expediently and hassle-freely as possible. Thinking as a student, for what reasons would I access the page, and how would I interact with it? This line of questioning is a basic version of what web developers/designers call “user stories,” which express a users’ goals in using a particular piece of software–from the perspective of the user, rather than the engineer.
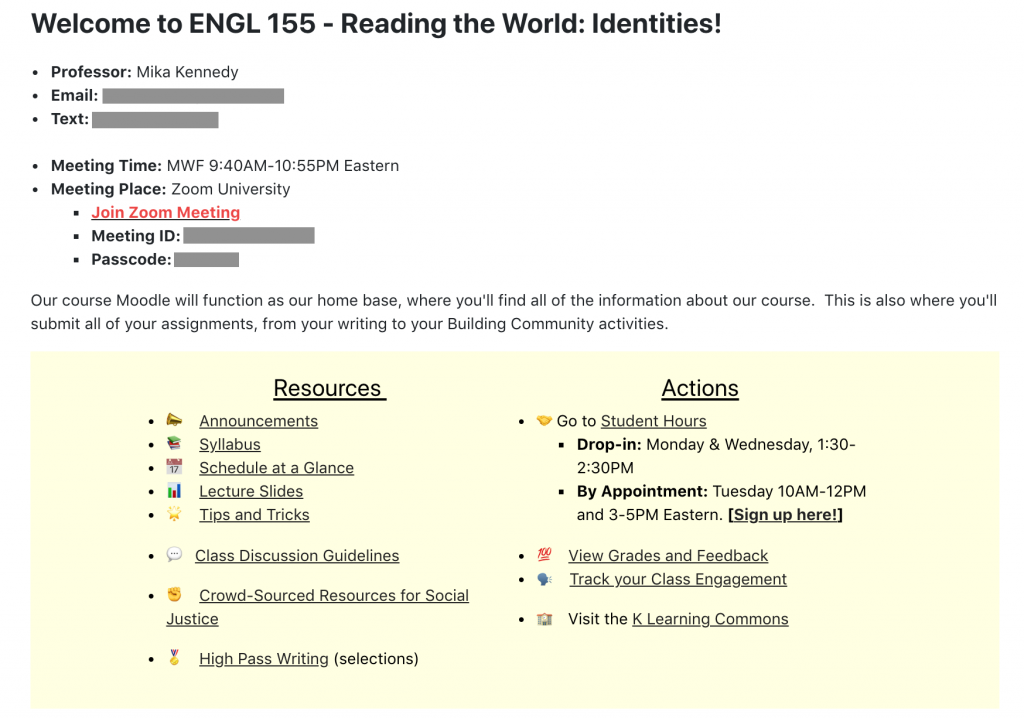
With my user stories in mind, the landing page I came up with looks like this:
Any modern web designer would never speak to me again if they saw this, but look: This is pandemic-era remote learning, not the iPhone 12. It gets the job done.
You’ll notice it has the same bones as the first page of a syllabus, listing instructor contact info and all relevant course meeting info. It turned out this was quite important, though, because a decent number of my students used this Zoom link to log into class every single day (rather than logging in directly through the Zoom app, as I do). They were essentially walking into the Moodle “classroom” every morning.
A few additional suggestions for the landing page:
State how the space will be used: This is a general principle of inclusive pedagogy, but I think it’s especially important in digital space, where the different ways we inhabit and interpret our surroundings are augmented. In a world where a Moodle page could mean or do any number of things, it’s helpful to be as transparent as possible about how it will be used in this particular context.
Divide links into Resources and Actions: I know, I mentioned not making Moodle a link repository and then immediately offered a screenshot of a bunch of links. But thinking about how to organize those links can help shape a student’s Moodle experience. In my case, I wanted it to be clear which links included passive reference material, and which links were the ones they’d want to use if there was some particular action they wanted to carry out.
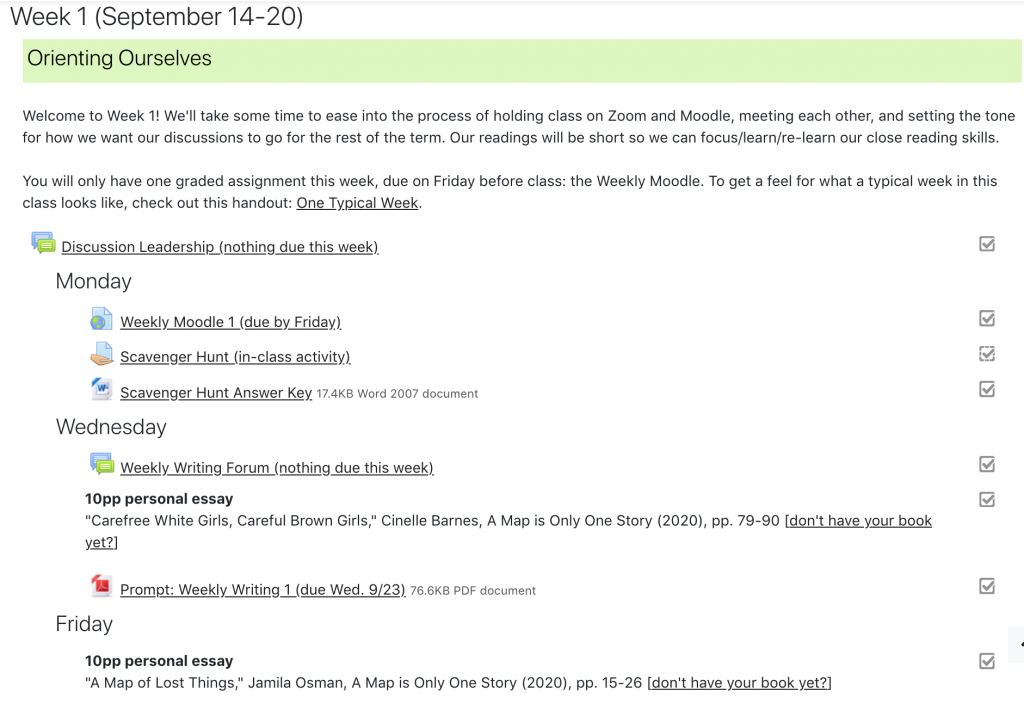
Moodle as Weekly Planner
I also used Moodle as a “weekly planner” for the course. While the syllabus listed the reading/major due date schedule for the entire quarter, I reproduced this on Moodle week-by-week, adding in the links to that week’s Discussion Forums and submission portals, etc.
I chose to display these in reverse chronological order, so the most relevant week would always be easiest to access; and all on one page, in order to limit the number of clicks required to access information. (One-page websites have been all the rage for a few years now, which is an abrupt 180 from the thousands of micro-pages that distinguished web design in the early 2000s. The shift has been largely influenced by smartphone and tablet usage, where scrolling is easier than clicking, and the fact that Internet providers are able to smoothly load a lot more content than they could before.)
Here’s what that looked like:
Mutual Assured Organization: If you’re not personally a big fan of Moodle or LMS usage in general, making a schedule like this every week might seem like an inane way to spend your time, especially since you’ve already done it once for your syllabus. And your mileage may certainly vary! But I got a lot out of this, because I’d typically put up the Weekly Schedule on a Friday afternoon, and I would use it as my own time to frame the week for myself, actively reorient myself to my syllabus, and make sure I was on top of my work for the class as well, re: prompts and deadlines and any number of things. I used this organizer just as much as–if not more than–my students did, so it felt like part of the process, rather than extraneous time spent Moodling.
Redundancy: “Per the syllabus…” indeed! Yes, this is all in the syllabus! Redundancy is generally frowned upon when designing user interfaces, because redundancies the user can see introduce needless complexities and messiness. But I think there’s still value in putting information in multiple places. Per inclusive pedagogy, we’re not all using these digital spaces in the same way, so the most “natural” path won’t be the same for everyone. Offering information multiple times, in multiple modalities, gives students the best chance of finding the path that works for them.
Metadata: You may have noticed that the readings are introduced with a bolded heading that notes their length and genre. I was using this metadata to design my syllabus, and ending up leaving it in for my students as well, as another way of trying to distinguish the syllabus/Moodle from a straight link repository. All links look equal in digital space, absent the heft of a printed handout or the visual differences between a blog post and an academic article–distinctions that can help students get a sense of what they’re in for, how the should be reading, and how long it will take. I used the additional short description to give the links a “shape,” so students would know before 2AM when they open all of them in tabs whether they should have set aside time to read a 35-page academic article, or a 2-page blog post.
Personalization: I also used the Moodle version of our weekly schedule to present examples of student work and collect resources people brought up in class. With students’ permission, I included links to asynchronous work my students had completed whenever they wished to share it, and added links to documentaries, articles, Twitter threads, etc. that people brought up in class–basically, the web version of putting student work up on the walls. Clearly labeled and not overwhelmingly frequent, I think this added a more interactive, human touch to the Weekly Schedule without cluttering out assigned readings/assignment submission links. It was a way to highlight student contributions without hiding them deep in the underground bunker that old/non-mandatory Discussion Forums can sometimes become.
**Deep Cut: If you enjoy thinking about design and are positively enthralled by the idea of getting deeper into the weeds–to be perfectly honest, far, far, far, far, far, deeper than anyone might need to go for our purposes–the futur is an LA-based design company that has a series of web videos that break down the process and considerations that go into building websites that work. While they specialize in corporate/consumer-facing work, I find the basic tenets easily translatable. Plus, the client example they use is a fancy rustic bed and breakfast in British Columbia, which is a lovely bit of vicarious travel during stay-at-home.
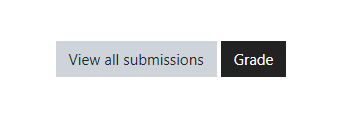
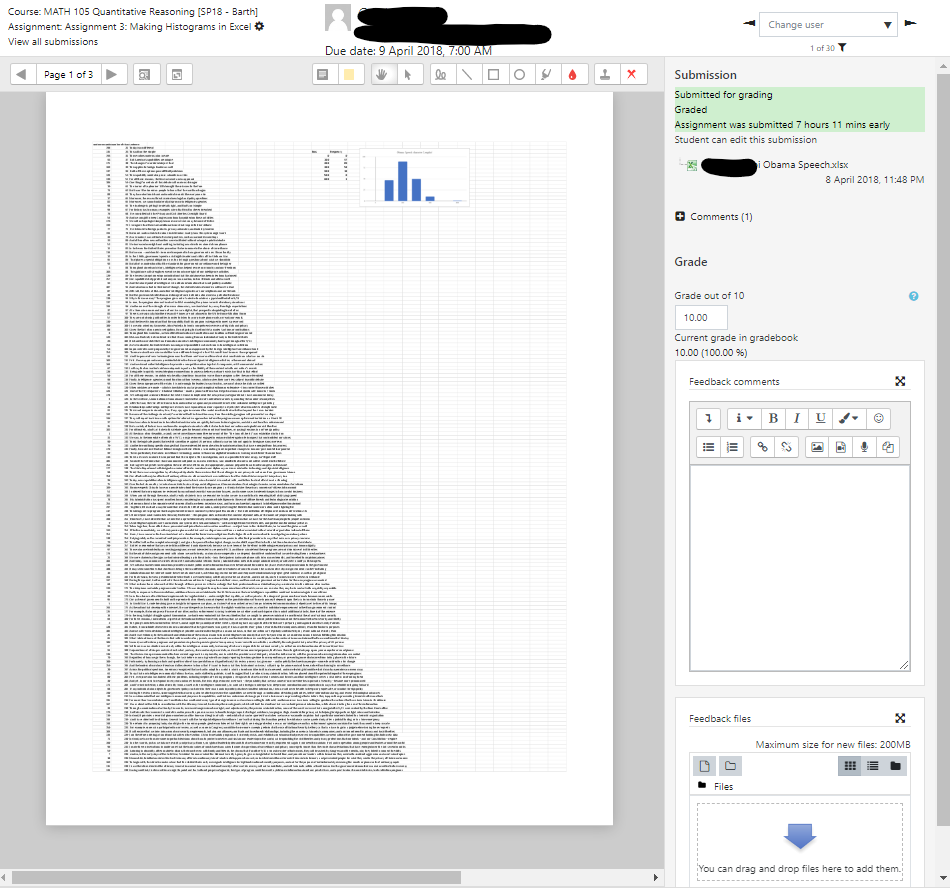
The name says it all! When I click on a Moodle assignment, I’m presented with two buttons below. For Quick Grading, I’ll choose View all submissions
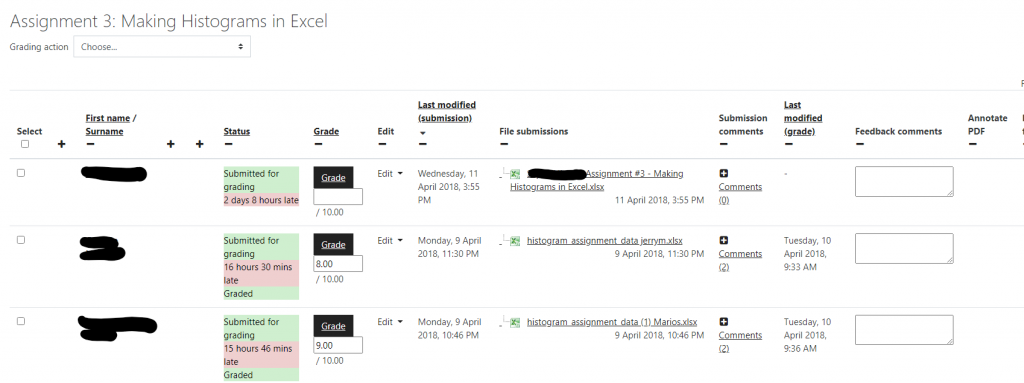
The result is a screen (screenshot below) that shows all the enrolled students, a link to each submission that opens in a separate window, the status of their submission for this exercise, a place to enter a score, and several places to enter my feedback. For brief assignments this is my go-to option. Especially helpful is that students in this screen can be sorted in a number of user-defined ways: by date of submission, grading status, etc so that I don’t need to scroll through all the students to find the few that I haven’t yet graded.
To be safe, remember to select Save all quick grading changes at the bottom of the screen when you’ve finished.
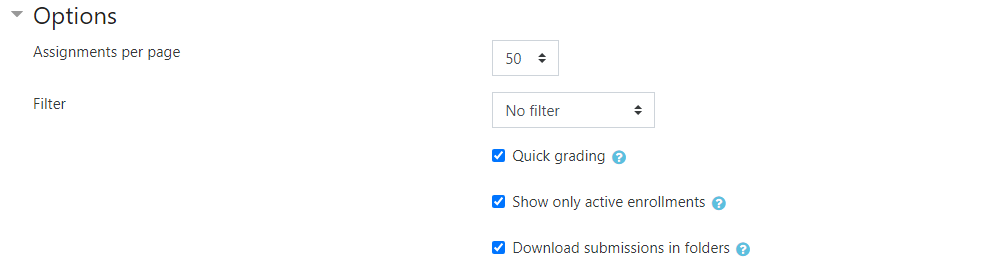
If you don’t see the columns with fillable Grade boxes, scroll down to the bottom and turn that on with the Quick Grading checkbox:
The “+” and “-” symbols at the top of each column can be selected to either show more or fewer of the columns. That helps so that all the columns I want to see can fit the width of my computer screen.
If you don’t see “Feedback comments” column, edit the settings for the assignment. More about this next in Thing 2.
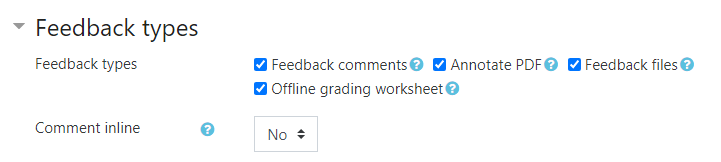
Thing 2: Set up activities to include the whole range of feedback types
I include all the possible feedback types in every activity. For a given activty, select edit and settings, then expand the Feedback types menu to check all the available options. We’ll see all those options in action in Thing 4 below.
Thing 3: Use Moodle’s Duplicate function to carry your settings over to a new activity
Instead of counting on my memory to select the feedback types for each new assignment, I set up one initial activity carefully, and then use the Moodle Duplicate feature to use that previous activity as a template for all subsequent activities of that type. The properties I’ve carefully selected come along with the duplicate automatically.
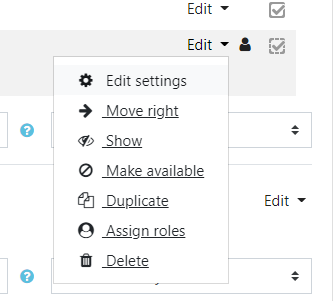
I used Moodle’s Duplicate feature: from my main page, select Gear icon, then turn on editing by selectin Editing is OFF. Now in the Edit drop-down menu on the right side of the window for a chosen activity I can select Duplicate
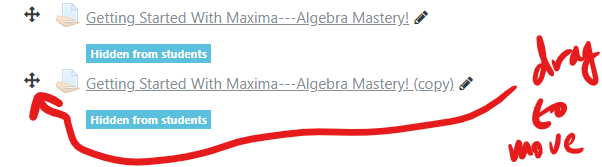
The result will be a new activity with all the settings as in the original. Drag the cross icon to move the new item where you want it in your Moodle page, and Edit settings to transform this into your new activity.
Thing 4: The Grade Button
If I really want to grade papers, I should push Grade, right?
The result is a screen that shows everything possible for a single student’s submission: Notice that the feedback options we set in Thing 2 cause this screen to have
Annotate-able file
A text editor for typing instructor feedback
A place to upload a feedback document file
When I’ve finished working with this student’s submission, I can select Save and show next to move on to another student. To me, it is sometimes inconvenient that Moodle always brings me these papers in the same order: alphabetical by surname. It is possible to circumvent that a little by using the Change user dropdown menu in the upper right corner of the window. A helpful feature in that menu is that ungraded submissions are indicated with an asterisk *. This is especially useful when I’m going back through an assignment to see late submissions and revised resubmissions.
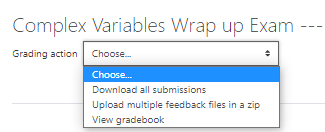
Thing 5: Downloads and Uploads
A few days ago I had a whole class roster full of long PDF final exam documents to grade. For each, I planned to reply with a PDF document of feedback. To streamline that workflow, I downloaded all the submissions choosing View All Submissions selecting Download all submissions from the Grading Options dropdown menu:
The result was that a compressed (zip) folder appeared in my Download directory. Clicking on that revealed a whole folder full of folders, each one with the name of a student who had submitted work. For a given student, the directory contained all the submitted files. Being careful not to change the names of any of those files or of directories in which they were contained, I happily annotated the submitted files. I included in each student’s directory my own document file of feedback. The name of this feedback file isn’t important. The thing that matters is that my feedback file for each student got put in that student’s directory. When I was finished, I selected Upload multiple feedback files in a zip, and uploaded the modified zip directory. All the feedback files got to the right place, as did the annotations on the students’ submissions.
I then used the Quick Grade feature to enter the students exam scores in Moodle and I was done. Or…
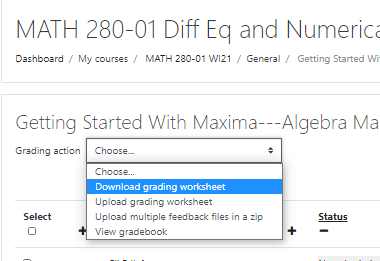
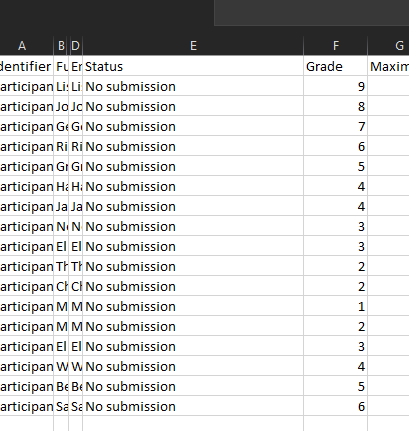
Downloading and Uploading Grade worksheet
It is possible to enter grades for an assignment on your own device, then upload them all at once to Moodle. In the View All Submissions page, select Download grade worksheet from the Grading Options dropdown menu:
The result will be a downloaded document that you can open on your device with MS Excel. Enter scores in the Grade column
Save the modified document (without changing the filename or filetype) and then select Upload grading worksheet at the Moodle Grading Action dropdown menu. The grades you entered will now appear in all the usual places in Moodle.
I just noticed something that will make writing recommendation letters for students in my class. So. Much. Easier. And better informed. Going forward, I’ll use a slick grade reporting feature of Moodle to quickly re-acquaint me with student work so that I can share detailed impressions that in the past I would have forgotten.
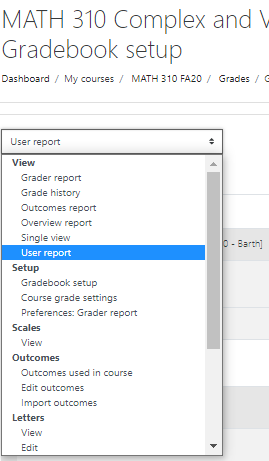
Suppose a student from my spring class asks for a letter to support her application to grad school. (This isn’t a hypothetical example!) I go to the Moodle page for that class, select Gear icon, and then Gradebook Setup, and then User Report from the dropdown menu at the upper left
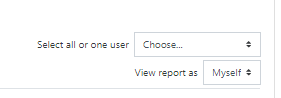
I select the individual student with the dropdown menu on the right of the resulting screen
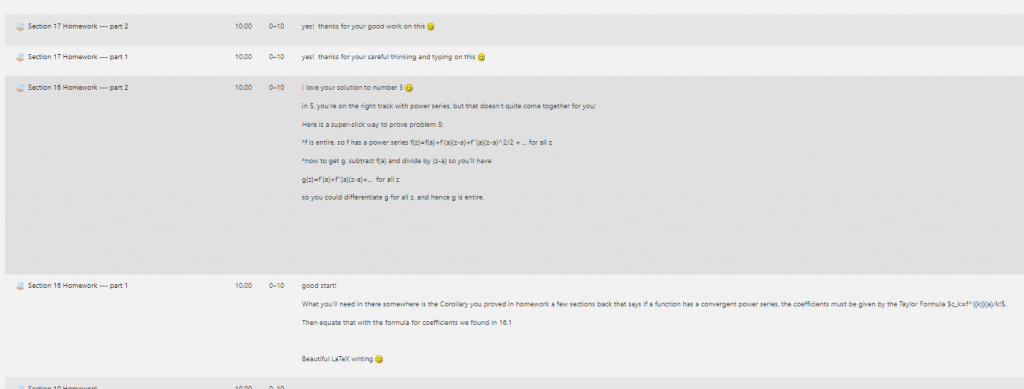
Now the user report looks something like this excerpt:
Notice how I can see my feedback to this student for every assignment. A few minutes with this information reminds me about my day-by-day impressions of this student’s work.
For this to be visible, I need to have all my assignments set up to allow Feedback Comments.
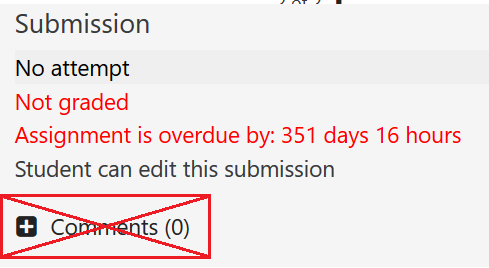
“How did my grade get so low? In Moodle it looks like I’m getting a B”
Student.
Students read the syllabus, right? Every course I teach has a syllabus section like in the screenshot below. It is completely clear that I use the percentages given there to compute students’ course grades. Trouble is that while I have the syllabus in my mind all the time, students take one (or fewer) look and move on! The students see Moodle every day, and the message they get from Moodle about their course grade is, in my experience, very vivid. What’s more, many come from high schools where the ability to “check my grade online” was central to their experience (and that of their parents!) Before I learned to make Moodle gradebook do my bidding, the student quoted above was in almost every course I taught!
The section of my Syllabus that details the weights each component of the students’ work will contribute to the course grade.
Thing 1: The Simplest Thing — Hide the “Course total”
I like that students can see at Moodle which assignments they’ve completed and my feedback on each of them. Before I learned to bend Moodle’s “Course total” to my will, I took the simple step to hide that from students (it is visible by default at Moodle.) That gives a simple way for students to see feedback on individual tasks without getting a false idea about their overall grade. To hide the Course total, use the Gear icon, then Gradebook Setup, then select Edit for the Course total and select Hide.
The easiest way to prevent Moodle from giving students a false sense of their course grade is to hide course totals!
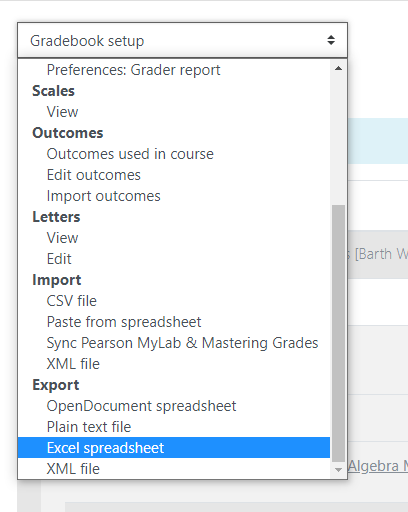
With this safeguard in place, I exported Moodle scores and computed students’ course grades outside of Moodle in MS Excel. To export your Moodle gradebook, go to Gear icon, then Gradebook Setup, then at the bottom of the accordion menu select Excel spreadsheet under Export:
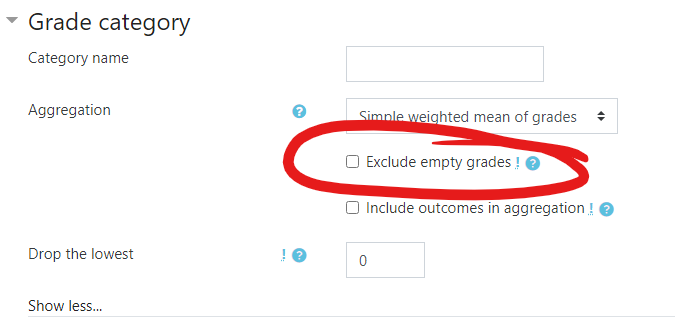
Thing 2: Get to know the “Exclude empty grades” checkbox
Moving on! If I want students to see a summary of how they are doing in the course — and for that reason decide not to hide the course total as in Thing 1 — I need to understand one key piece of Moodle’s default behavior. Here’s a scary real-life scenario: The student quoted at the top of this piece completes the first assignment of the course and scores 8 out of 10. Subsequently, this student leaves every other assignment untouched. With the default gradebook settings, when this student checks his grade at Moodle, the Course total will always say “80%”. That’s because Moodle’s default behavior is to exclude empty grades from total computations! Oh, honey.
To make the Moodle computed total reflect my gradebook reality, I turn off this default behavior with Gear icon, then Gradebook Setup, then select Edit for the Course, then Show More and finally uncheck “Exclude empty grades” as shown in the screenshot below.
By default in Moodle, “Exclude empty grades” is checked. With that setting Moodle computes a student’s course totals ignoring missing work.
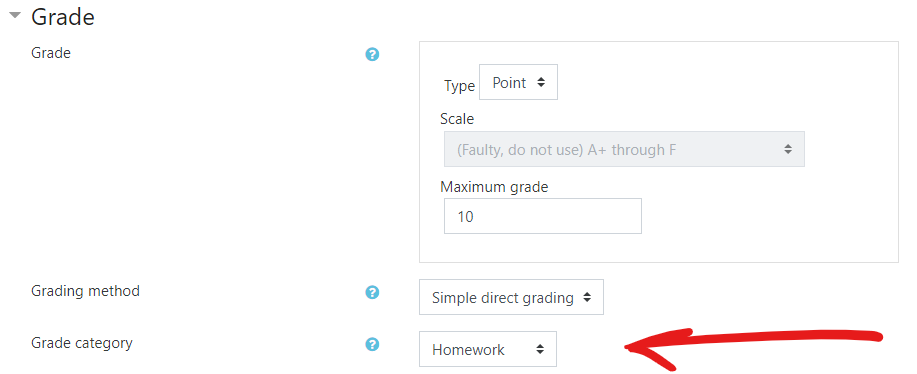
Thing 3: Set up Categories
Time to get serious. To make Moodle gradebook reflect my grading scheme, I need to set up categories and corresponding percentages in Moodle to match what I’ve written in the syllabus. When I have this all set up, the student will be able to see in Moodle exactly what I would calculate using the syllabus percentages.
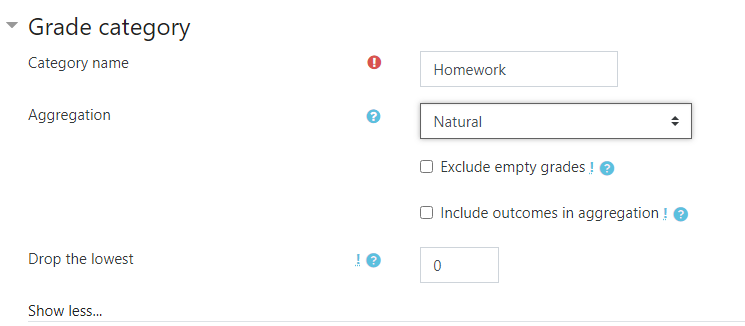
Start with Gear icon, then Gradebook Setup, then scroll to the bottom of the screen, where you’ll see the needed Add Category button.
The result will be a screen with a place to name your new category.
Show More reveals the now-familiar Exclude empty grades checkbox (see Thing 2 above)
Because I want students to see the actual total number of points earned, I chose Natural as the Aggregation method for this category. Picking the Aggregation that works for you might require some trial and error, or email Josh Moon! It’s important to note that for all this to work, the Course total aggregation method needs to at its default method Simple weighted mean of grades. Josh Moon described the aggregation methods like this: Natural totals points. Simple Weighted Mean of Grades means that items are weighted based on how much they’re worth (a 100pt assignment is worth 10x a 10pt assignment). Mean of Grades does the opposite (averages the 100pt, 10pt, and 1pt assignment all the same).
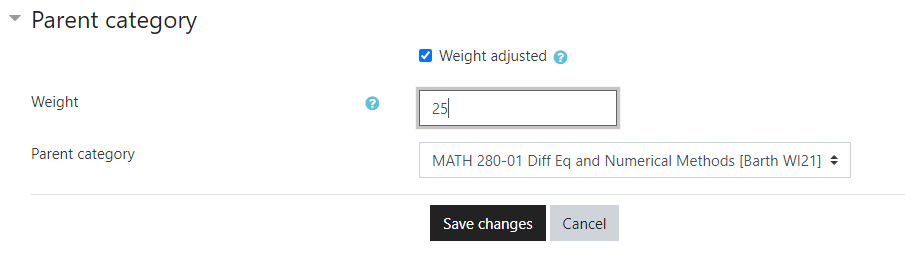
To specify the percentage weight for this category, select Parent Category, check the Weight adjusted box, and type in the percentage Weight to match the syllabus. Then Save changes.
Repeat for each of the other categories you’d like to create. It is important to note that everything doesn’t necessarily need a category. A stand-alone item like “Research Paper” works fine without one.
Thing 4: Put Each Activity in its Category
In the Edit Settings screen for a given activity, select Grade and notice an Grade Category accordion menu that allows you to choose from the Categories you’ve created. Again, it is important to note that everything doesn’t necessarily need a category. A stand-alone item like “Research Paper” can work fine without one.
Thing 5: Set up one activity in each category, then use that as a template with Duplicate
In this post and another one about workflows, I’ve shown some things about Moodle gradebook that I’ve found helpful. It all works if I remember to set up the Moodle Activities with the right collection of options and settings. To make that easier as the course went along, I used Moodle’s Duplicate feature: from my main page, select Gear icon, then turn on editing by selecting Editing is OFF. Now in the Edit drop-down menu on the right side of the window for a chosen activity I can select Duplicate
The result will be a new activity with all the settings as in the original. Drag the cross icon to move the new item where you want it in your Moodle page, and Edit settings to transform this into your new activity.
Once registration for the new term is completed, a new Moodle site will be automatically generated for your courses. If you’ve used Moodle to organize a course in the past, it is really convenient to import that existing setup into the new course. Here’s a quick video from Josh Moon showing you how to do it!
I’ve heard from lots of colleagues over the years that a quick survey of students in your class at the midpoint of the term — together with a discussion with your class about what you heard in the responses — improves the class climate and gives the instructor important feedback. Especially at this time when we’re all spending lots of time developing content for online delivery of our courses, a midterm student survey can show us which parts of our course the students appreciate and value. And just as importantly, we might learn that the students aren’t finding some parts of the course useful for their learning, in which case the instructor can stop spending so much time developing those materials!
Below are two quick (3 minutes each) videos showing how I created online student surveys in two platforms: Moodle and in Microsoft Forms.
Setting up a student survey in Moodle using the Feedback Activity
At the beginning of my course, I ask students to complete a survey to provide me with some information I need to make the course best fit their needs. Especially with online content, it is important for me to know about time zone differences, technology needs, and student preferences about what name to use when I address them and how to pronounce names.
Years ago, I just sent an email to my class and asked each student to reply. That left me with a lot of information to process. More recently I have used Google Forms and Microsoft Forms to easily make and distribute surveys and collect the responses. Now that Moodle is a part of everyone’s life at K, I’ve switched to the built-in survey feature on that platform. Here’s a five-minute video that shows everything you’ll need to make a survey using the Feedback activity in Moodle. This approach has the advantages that
It is immediately visible to my students without the need to send a link by email
it doesn’t require students to sign in at another platform
it is available only to students in the class
the data lives securely with all the other information at Moodle
it has roughly the same rich features as the more famous solutions Google Forms and MS Forms
you could reward students with some points in the Moodle grade book for completing the questionnaire!
Wait, I thought we just rolled out Teams? Why I am using Moodle?
Teams is not designed to replace Moodle. Moodle and Teams can compliment one another. Moodle is an open-sourced, community-supported product that has decades of experience in traditional Learning Management System functions like receiving Assignments, distributing Files, and organizing a course. Though Microsoft has attempted to introduce some of those functions to Teams, we recommend focusing Teams use on their modern Chat interface, the videoconferencing functions, and other collaboration tools.
Where is my Moodle course? I don’t see it!
Visit https://moodle.kzoo.edu/login/index.php to access the login page. Enter your K ID and password. Once you are logged in, you can look at the Course Overview block on the Dashboard. Fall 2020 sites will be listed under “Future” until September 14th. At that time, they will also appear in My Courses on the menu on the left.
Okay, I found my Moodle. How do I begin setting this up?
Consider starting the the Four Models for Your Moodle Post on the Teaching Commons. What do you need your Moodle site to do? Do you need weekly sections or should you delete them? To learn how to use the site, you can watch a video introduction on Stream. If you’re inclined to read, there is also a Moodle 101 page with instructions. Would you like to talk to a human being? Contact Josh Moon, Educational Technology Specialist.
How do I get students enrolled in my Moodle site?
The simplest solution is to make sure you have set your Course Visibility to “Show” and then copy the Moodle course’s URL into an email to students (example: https://moodle.kzoo.edu/course/view.php?id=2638). Alternately, you can direct students to navigate to the appropriate departmental category under the active quarter Course Sites. In either case, they will need to login and click the “enroll me” button for the course.
How can I limit who can join my Moodle site?
Moodle does allow “Enrollment keys,” which are essentially passwords to protect course access. If one is especially concerned, you can prevent students from self-enrolling and manually add students from your course roster. For the latter option, click “Participants” in the menu then select “Enrollment Methods” in the gear wheel icon. By clicking the eye icon, you can disable Self Enrollment for students. You will then have to return to Enroll Users and manually search for students.
How do I open my Moodle site to students?
On your course’s main page, click the gear wheel in the upper right and select “Edit settings.” In the Settings option for Course Visibility, change the setting to “Show.”
What is the easiest way to get my files on there?
While you can use the File resource to manually add files with more control over settings, you can also turn your Editing On then drag-and-drop files from a folder on your computer. You can also go back and adjust settings to files already on Moodle.
How do I give feedback to students?
If you’re using the Assignment activity, you can choose multiple options for giving feedback. The most common are to enable Feedback Comments to give the grader a text window to add comments and Feedback Files which allows the grader to upload a file of their own for grading. Rubrics, a PDF editor, and other options exist. Note: this is not what the small “Comments…” (below) field is for.
I plan on delivering a lot of video content to students with Moodle. What is my best option?
Hosting large video files directly on Moodle causes problems for the system and are difficult to access for users. Fortunately, there are other options to get your video content on Moodle. If you need to host your video somewhere, you can upload it to Microsoft Stream or your own hosting solution. Moodle will allow you to link or embed these hosted files.