Importing Question Banks for Moodle Quizzes — Duong Nguyen

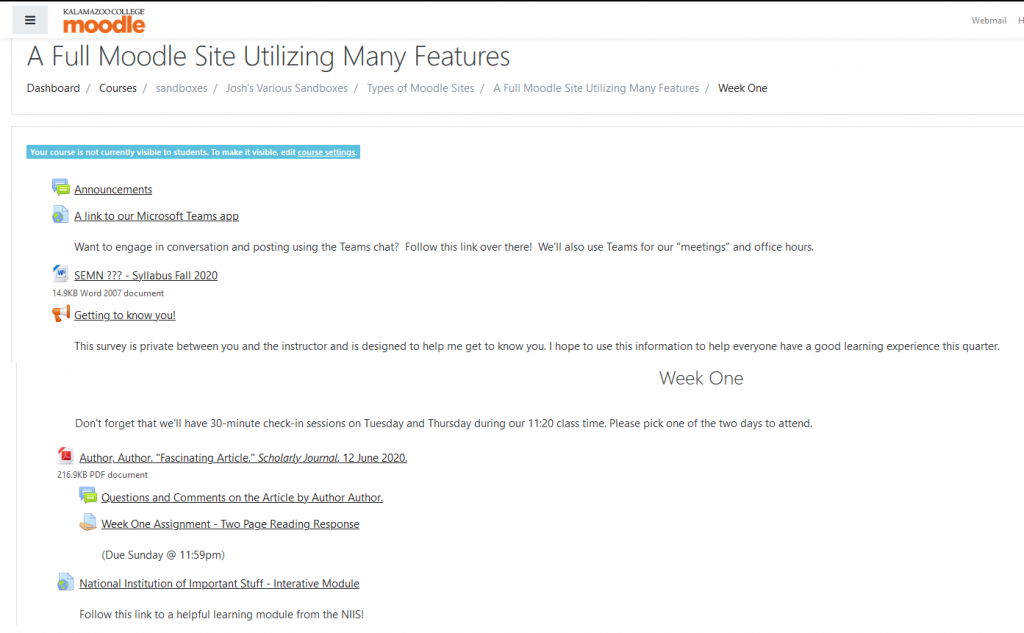
The Moodle web interface allows easy categorization of the questions, but that method will take time if you want to create a big test bank since it requires multi-step navigation via on-screen buttons to write each question.

Here I’ll show straightforward ways to construct and import questions to Moodle and create a question bank.

Once you’re logged into the course page on Moodle, click on the gear symbol on the top right window, then choose More…

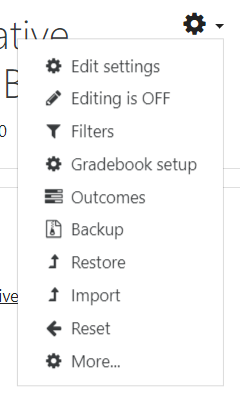
Scroll down to the bottom of the page and you’ll see Question Bank

If you’d like to create a new question in a particular category, you should choose the destination category from the drop down list before hitting Create a new question button. From here, there will be on-screen navigation to help you choose the question types and write the questions.

Importing questions in the Aiken Format

The Aiken Format works best for multiple choice questions. Many multiple multiple choice questions can be written in the same text file then imported to Moodle. For that reason, this method saves a lot of time because you don’t have to go through multiple steps to write an individual questions like in Moodle Web. An example of Aiken format is:

Question text
A. Choice 1
B. Choice 2
C. Choice 3
ANSWER: D

Some things to note:

  • ‘ANSWER’ must be all capitalized, followed by : and a space. Otherwise, Moodle will give you an error during the import.
  • .Each answer choice must start with a single uppercase letter, followed by a period (.) or parenthesis ), then a space.
  • The file has to be saved as plain text (.txt)
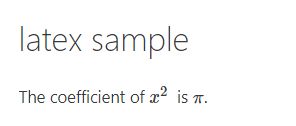
  • The Aiken format supports Latex Math symbols. You can use ∖( and ∖) or the double-dollars signs $$   $$ for Latex math mode. Commonly used math symbols in Moodle are detailed in Rick’s previous post.
  • The Aiken format only supports multiple choice questions so if you want to add a variety of the question types (short answer, calculated, multi-parts quetions, etc. ), this format might not be for you.
  • It seems that graphics or any kind of text formatting can only be added manually after the questions are imported to Moodle. In Windows, the built-in text editor NotePad provides the plain-text format. In macOS, the TextEdit program is found in the Utilities folder in Applications.

Once you have created a text file with questions in the Aiken format, select “import” from the Question Bank menu in moodle and navigate to the text file.

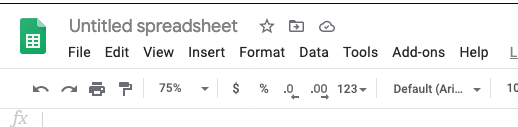
Creating question banks in Google Sheets

(QB)2 is a user-friendly add-on to help educators write and manage question bank directly in Google Sheets. It is also a great tool to bring your current question bank online.

You can install the needed extenstion to Google Sheets by selecting Add-ons and searching for (QB)2

After installing and activating the add-on in Google Sheets, you are ready to begin creating quiz questions. This 6-minute video shows you how.

More help on (QB)2 is available in this video from the package developer.

Math Symbols in Moodle

I know, it isn’t for everyone. But if you need to typeset a math symbol, you need it to be easy to enter and correctly formatted. Moodle has a built-in capability to interpret math symbols using the LaTeX typesetting language.

All that’s needed are double dollar signs, like in this little example: I created an assignment call “latex sample” and typed the following in the assignment description:

The coefficient of $$x^2$$ is $$\pi$$.

That displays in Moodle as

If you aren’t familiar with LaTeX:

Here is my top-ten list of most needed LaTeX symbols.

  1. Subscripts use _ (underscore): $$a_1$$, $$H_a$$, $$k_s$$, etc
  2. Exponents and superscripts ^ (caret): $$x^2$$, $$e^x$$, etc
  3. Greek letter are preceded by \ (backslash): $$\pi$, $$\alpha$$, $$\mu$$ etc
  4. Fractions use a special construct: $$ \frac{ }{ } $$ For example “pi over 2” would be entered as $$ \frac{\pi}{2}$$
  5. Numbers and lots of symbols correspond to their typical keyboard symbol: prime = apostrophe, absolute value = vertical bar on backslash key $$ |x| $$, parens = (), as well as the operators +, –
  6. Integrals use the construction $$ \int $$, for example $$ \int_a^b f(x) dx $$
  7. Multiplication: use \cdot like this $$ x \cdot x^2 = x^3 $$
  8. If you want an old-fashioned “multiply by” symbol, use $$ 3 \times 2 = 6 $$
  9. If you want an old-fashioned “divided by” symbol, use $$ 6 \div 2 = 3 $$
  10. Beware of Percent Sign and literal Dollar Sign: They need to have a backslash $$ 21\% $$ and $$ \$21.99 $$.
  11. As suits this extra tip: infinity is entered with this sad misspelling: $$ \infty $$.

For more information, here’s a complete glossary of math symbols in LaTeX

Moodle Forums: Subscriptions and Notifications

When you use Moodle Forums in your course, there are a number of settings that control when and to whom email notifications are sent. While its important that everyone receives the notifications they need, we want to make sure nobody is being overwhelmed by too many email notifications. This video presents the methods in Moodle to manage subscription and notifications for Forums.

A 6.5 minute video by Josh Moon

This video is posted at Stream. Click here to learn more about Stream.

Activity Completion in Moodle

The Activity Completion feature in Moodle helpful for students to keep their work in your course organized, and can be motivating for them: there’s a feeling of accomplishment when checking those boxes!

A 10-minute video by Josh Moon

This video is posted at Stream. Click here to learn more about Stream.

Quizzes and Assignments in Moodle Make Feedback Easy

Frequent assessment and timely, detailed feedback are hallmarks for successful course design in any situation, and all-the-more so as we move to online course delivery. I’ve been using Moodle quizzes and assignments for ten years and find that it fits a high-volume workflow in a way the efficiently makes use of my time while allowing for prompt and personal feedback to students.

In this 13-minute video,

  • I construct a sample quiz from scratch in Moodle.
  • construct a sample assignment in Moodle
  • show a number of options available from within Moodle for me to quickly provide detailed feedback to students about their work.
A 13-minute video by Rick Barth

Getting Started with Moodle — Josh Moon

When someone is using Moodle for the first time, I like to invite them into my office so we can sit side-by-side and look at the interface together. Recognizing that we will have many new Moodle users and meeting in person with everyone is neither prudent nor feasible, I’ve set up a set of resources to help provide multiple entry points. First, if you’re more interested in a visual explanation, I’ve created a video walk-through the follows closely to the welcome conversation that I like to have.

An 11-minute video by Josh Moon. This video is posted at Stream. Click here to learn more about Stream.

Let me talk about some helpful points to get you started!

Don’t worry if you’re starting slowly. Your course Moodle site will not be visible to students when it is created; it will not be visible until you decide you are ready for it to be visible. When you are ready, go into your course settings (gear wheel icon in the upper right) and switch Course Visibility to “show.” Even if you open your class for Week One, you can hide any future weeks as you develop them.

Moodle has many features, but faculty are free to use as few or as many as seem appropriate for their course and their teaching style. A useful minimal set of information to provide on your course site would be a copy of your syllabus, contact information for your students to contact you (e.g., email address or Teams chat, etc), and links to other resources used by your class (e.g., Teams site, external software, etc) if you’re not primarily going to use Moodle. In another post in the #KTeachDev2020 collection, we demonstrate different options for using the platform from high-engagement to a minimalist link hub.

Tips to get the basics:
• Add a syllabus. With your Editing On, drag-or-drop a PDF, Word doc, or your format of choice.
• Use the URL resource to post any vital links students will need to access features of the course.
• Add your contact information and any other important text. You can use a “Label” or edit your sections to add text, images, and formatting.

Moodle site sections can be organized by week (Weeks 1 – 10 + exam week) or by topic. The “by-week” organization is the most commonly used at K, so this is what will be set up by default. If you would rather have your page organized by topic, please let me know (josh.moon@kzoo.edu) and we can work on a format to better meet your needs.

Popular beginning features in Moodle including Assignment dropboxs, sharing files, adding Discussion Forums, and providing links. To avoid cognitive overload, I won’t be using this post to describe full-tutorials. Instead, I’ll direct you to Moodle 101 resources as another place to look around.

In addition to this post, the linked resources, and other content, I’ll be offering a synchronous Moodle 101 session for anyone who is able to attend. If you’d like to fill-out this Doodle poll by Saturday, July 18, I will send out a final time to accommodate as many as possible. We’ll record the session for anyone who can’t attend.

Looked forward to making your Fall Quarter Moodle a success!

Four Models for Your Moodle Course — Josh Moon

Using Moodle does not mean that there is one solution for every instructor, group of students, discipline, or pedagogy. With this in mind, we’ve created four different models to demonstrate what various utilizations of Moodle by an instructor might look like:

  • The Basics: A very simple, minimalist Moodle example
  • A full-featured example using many features
  • The Course Reserve: An example of a Moodle site that serves mostly as a course reserve of readings
  • The Link Hub: An example of a Moodle site that merely provides links to other sites (e.g., Teams site)

There are other options imaginable, so adjust these to meet your needs.

The Basics

This is quickest, simplest approach using the default course format. The instructor here has dragged-and-dropped their readings and other files directly from their computer (note: this brings along the file names but you can clean that up). They’ve done the same with the syllabus and added a few links with the URL tool. There are no explanatory text or instructions, no Assignment dropboxes, but that’s okay. This is the basics to provide students with the syllabus and readings.

A Full Moodle Site Utilizing Many Features

My “How to Organize a Week of Online Learning in Moodle” post from spring is based on this model. While this uses a similar weekly structure to The Basics site, you’ll see important differences. In terms of formatting, the instructor has used the Description fields to offer explanatory text about activities. File names have also been cleaned up and renamed (full citations are a copyright recommendation). They have added more tools including a discussion Forum, Assignment dropbox, and a Feedback survey. Some resources utilize “Move Right” to imply their direct relationship to the reading PDF and provide structure. Again, there are many gradients between this option and the Basics. It’s all about the features you and students could benefit from.

The “Course Reserve.”

This Moodle site has done away with the weekly format and placed all content in a list at the General (top) section. The idea here is to replicate a course reserve and supply students with the reading documents that they need for the quarter. If you already have a plan to facilitate discussion, support collaboration, receive assignments, and just need a convenient space to supply students with documents, this is the template for you.

The Link Hub

If you’re doing all of your digital communication with students on another platform or with other software, you can keep Moodle to a jumping off point with links. Even if you’re not spending much (or any!) time on Moodle, the goal here is to help students stay organized and have at least one, consistent hub to keep their online course content accessible that every instructor is using in some capacity.

Organizing an Asynchronous Class in Moodle — Chuck Stull

In the Spring, I had students in Taiwan, India, Greece, Spain, and in all US time zones, including Alaska. Their locations, plus complicated work schedules for some students, made synchronous classes unworkable for me. I designed my class to be as accessible as possible, using Moodle.

Pages

My main organizing tool was a Moodle “Page” for each week. This page listed all of the assignments and activities for that week, with links. At the beginning of the week, I would post a short Moodle Announcement with a link to the page; students would automatically get a copy by email. This gave them three places to access the page— their email inbox, the announcement forum, and in the Moodle section for that week.

I used the following structure for each week’s page:

  1. Logistics. This section was about coordination— discussion groups, deadlines, extensions, etc.
  2. Review. Typically, this section had three parts— an anonymous survey on how the week had gone (using Moodle’s Feedback tool); an outline of the topics we had covered the previous week and an ungraded self-test on those topics.
  3. Project. A short weekly assignment that contributed to their longer research paper that was due late in the quarter.
  4. New Content. This section was the longest part of the page. I would embed 3-6 short videos I had made on the week’s topics. My videos were narrated PowerPoints, posted on YouTube. Each video would be followed by a short quiz or short assignment. Readings, either from the textbook or other sources, would be posted here along with required response questions. I would also assign a few questions related to the week’s content to discuss with their small group and post to the discussion forum.

Here, in two parts, is a screenshot of my Week 2 Moodle Page. Click on each image to see them full size:

Deadlines

Everything was due at the same time at the end of the week. In practice this meant, some students worked through everything as soon as it was posted; some spread the work throughout the week; and some waited until just before the deadline to start. (I initially set the deadlines for both my classes at the same time but that was too difficult for me, so I ended up staggering them— one due Sunday night and the other class due Monday night.) I opened the next week’s work the following morning.

Labels

Labels were a really useful Moodle tool that I hadn’t used earlier. I used simple boldface titles to identify related material and assignments on Moodle. I used photos as labels to differentiate my courses.

Review, Enrichment, and Advanced

I included some optional materials on Moodle. Econ 101 was a prerequisite for one of my classes. I linked videos and chapters from online textbooks on topics and models that they needed to remember. Beyond the review materials, each week I would try to provide links for students who had the time and interest to learn more. “Enrichment” materials provided a deeper view into particular aspects of a week’s topics. These weren’t more difficult, but they provided additional insights. “Advanced” materials were for students who were looking for additional challenges. They were beyond what I would require for this level class but would be accessible to some students.

“Selfie” videos

A few times during the quarter, I shared very short videos of myself— walking around campus or looking at the late Spring snowstorm. These were really just greetings, as opposed to course content. My intent was to try to make remote delivery a little more personal.

Overall, this approach worked well for me. It didn’t rely on sophisticated technology and students responded favorably to the organization.

Ideas for Organizing Your Moodle — Katie MacLean

Before the pandemic, I mostly used Moodle for the gradebook and to archive lots of pdfs, so I really needed step up my game for the spring. This video shows a few of the things I started to implement:

  • Consistent Rhythm
  • Visual Organization
  • Ease of Use
A ten-minute video by Katie MacLean