Use the new Bookings app to schedule advising meetings

Dearest Advisors, 

If you already use MS Outlook to manage your calendar, there’s a new app called Bookings available in our MS Office suite. Bookings allows students to sign up for meeting times based on your availability at Outlook. Here’s an 8-minute video screencast that shows the steps I used to set up my advising schedule. If you don’t have 8 minutes, scroll down for a few notes, obstacle warnings, and instructions from Josh Moon.  You can also take a look at his own Bookings calendar

Josh’s Notes:   

  • Bookings works best if you use Outlook and/or Teams to keep track of your calendar.  Bookings will sync and “talk” to those Microsoft Campus systems.  You can use it independently, but you’ll want a plan for managing your availability.  
  • Bookings and its language is optimized for organizations and groups with multiple staff members, but an individual can also use it to let people book time on their calendar.  There are faculty and staff already using it successfully in this manner.   
  • If you select the default Availability setting, appointments will be available whenever you are free on your calendar. You can further limit this by introducing “Custom hours” in the General Availability settings.   You can also set a different availability over a particular date range, for example during Advising Week.   
  • “Services” can be 1-on-1 or Group.  However, “Group” means that multiple separate individuals can access the same time slot, as in for a webinar or training.  If you want only one person or even one group to access a single time, choose 1-on-1.   Once you have a “Group” service, you cannot change it to 1-on-1!  
  • If you want the cost information to be omitted from your page all together, select “Price not set” instead of “Free.”   
  • The default scheduling page will ask for the person’s name, email, address, and phone number. You can remove and add fields as you like.  For example, you might create an option to pick between a Teams and in-person meeting.    

 
Bookings Steps for Advising Week Meetings:  

  1. Log in to Office.com  
  1. Select Bookings from the Apps.  
  1. Create a Bookings calendar. 
  1. Add a “Service” for your advising schedule 
  1. Fill out the settings for your “Service”.    
  • Choose how long a default appointment should last and whether you want a buffer time.  
  • Example: Meetings of 25 minutes + a five-minute buffer after, and your available appointments will look like:   
  • 2:00 – 2:25pm 
  • 2:30 – 2:55pm 
  • 3:00 – 3:25pm, etc.   
  • Availability options  
  • For the general availability, choose “Not Bookable.” It’ll be okay!  
  • Then, “Set a different availability for a date range” and choose your window of dates.   
  • If you don’t want Bookings to allow appointments any time you are available, set more custom hours.   
  1. “Save changes”, then copy the link to the new service and share it with your advisees! 

Customized Questions at SmartEvals

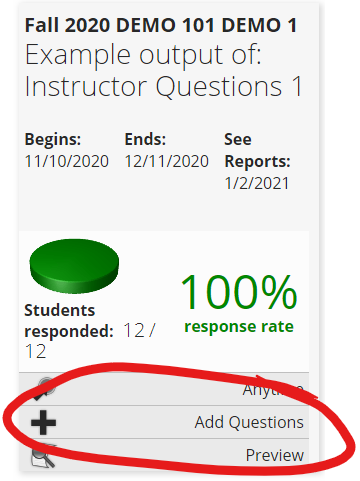
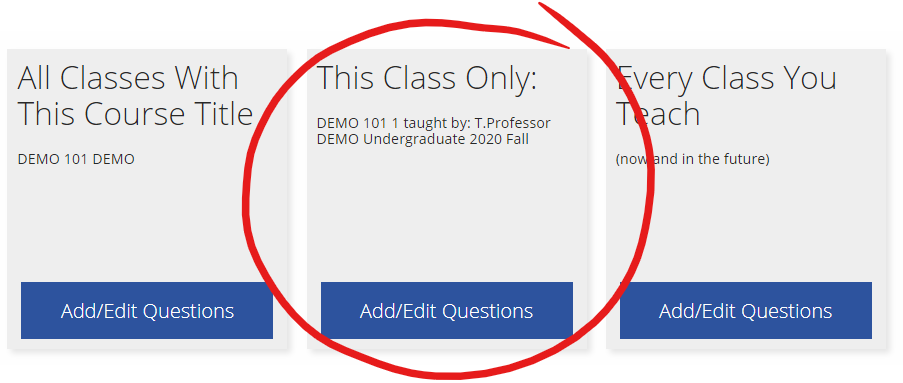
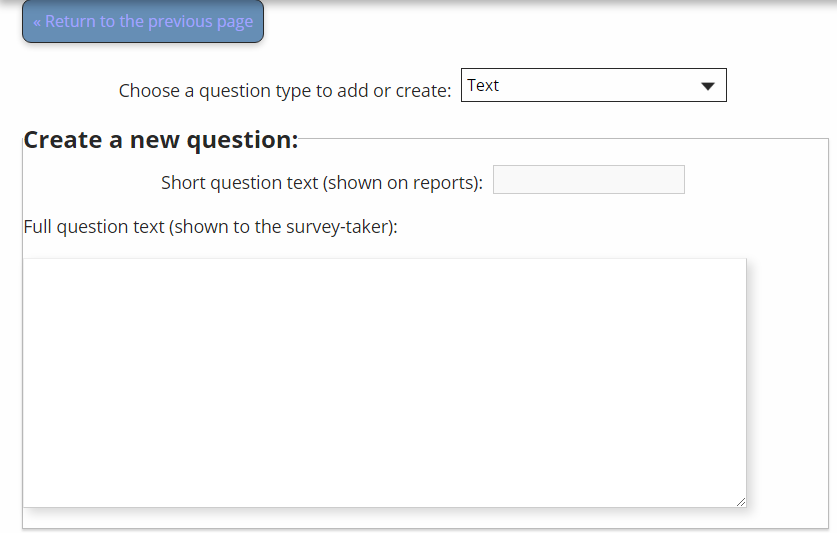
It is now possible for individual instructors at K, if desired, to include customized questions (up to 5 per course) in their course evaluations at SmartEvals.

Here’s a short (3.5 minute) video demonstrating the procedure. If you want to jump right in, scroll down to see screenshots of the three important steps

We need to talk about the size of your email inbox — Josh Moon

Information Services is in the midst of a long-term project to eventually migrate our email server to a “cloud” based Office 365 system.  When this happens – likely by the end of this academic year – email quotas will substantially increase.

While email attachments are quick and familiar, sending files to each other can fill up our Sent Items folders as well as the email storage of our recipients.

Follow this link for our five suggestions on how to get files to recipients without using email attachments and filling up your storage quota.

Importing a previous course into your new Moodle site — Josh Moon

Once registration for the new term is completed, a new Moodle site will be automatically generated for your courses. If you’ve used Moodle to organize a course in the past, it is really convenient to import that existing setup into the new course. Here’s a quick video from Josh Moon showing you how to do it!

Making an Online Midterm Student Survey for Your Class

I’ve heard from lots of colleagues over the years that a quick survey of students in your class at the midpoint of the term — together with a discussion with your class about what you heard in the responses — improves the class climate and gives the instructor important feedback. Especially at this time when we’re all spending lots of time developing content for online delivery of our courses, a midterm student survey can show us which parts of our course the students appreciate and value. And just as importantly, we might learn that the students aren’t finding some parts of the course useful for their learning, in which case the instructor can stop spending so much time developing those materials!

Below are two quick (3 minutes each) videos showing how I created online student surveys in two platforms: Moodle and in Microsoft Forms.

Setting up a student survey in Moodle using the Feedback Activity

Setting up a student survey in Microsoft Forms

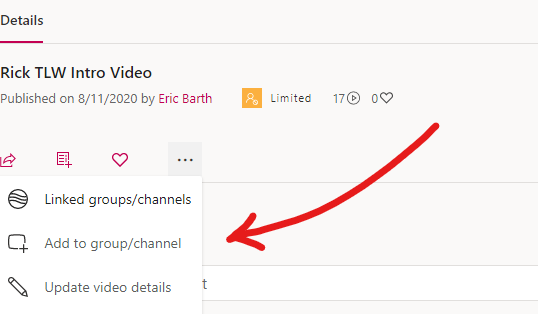
Granting Access to Your Stream Videos

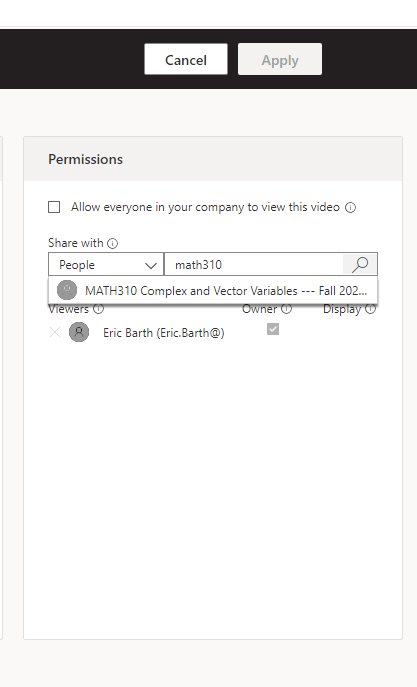
After you upload your video to Streams, you need to choose who will be able to access it. You can allow any user with a kzoo.edu account to see it, or you can limit access to individuals or groups of your choosing. Perhaps the most common way to do that is to grant access only to members of a Teams Channel—like for your course!

This 2-minute video demonstrates what you need:

If you want to bypass the video, here’s the step-by-step in pictures

Student Surveys in Moodle using the Feedback Activity

At the beginning of my course, I ask students to complete a survey to provide me with some information I need to make the course best fit their needs. Especially with online content, it is important for me to know about time zone differences, technology needs, and student preferences about what name to use when I address them and how to pronounce names.

Years ago, I just sent an email to my class and asked each student to reply. That left me with a lot of information to process. More recently I have used Google Forms and Microsoft Forms to easily make and distribute surveys and collect the responses. Now that Moodle is a part of everyone’s life at K, I’ve switched to the built-in survey feature on that platform. Here’s a five-minute video that shows everything you’ll need to make a survey using the Feedback activity in Moodle. This approach has the advantages that

  • It is immediately visible to my students without the need to send a link by email
  • it doesn’t require students to sign in at another platform
  • it is available only to students in the class
  • the data lives securely with all the other information at Moodle
  • it has roughly the same rich features as the more famous solutions Google Forms and MS Forms
  • you could reward students with some points in the Moodle grade book for completing the questionnaire!
A 5-minute video by Rick Barth

Here’s the documentation page on the Feedback activity from docs.moodle.org

Some Example Questions for Student Surveys

Your Name * (you don’t need this if you use Moodle Feedback or MS Forms, but you will if you use Google Forms)

Name you would like me and the class to call you *

Pronouns you would like me and the class to use when referring to you *

What time zone will you be in during fall quarter? *

Will you be on-campus or online only?

Your major/minor/concentration and year

Why are you taking this class? What do you hope to learn from it? *

Do you anticipate any challenges using Moodle and Teams (such as lack of internet access, no computer, etc.)?

What device and what size screen will you be using to access Moodle and Teams?

Have you taken online courses in the past? What worked well for you in online courses?

Do you have any special needs or learning differences that you would like me to know about?

Is there anything you are especially concerned about as we work together digitally? (Your fears go here!)

Getting Started with Teams for Your Class

Here are a selection of short videos from Microsoft showing some initial steps for getting Teams going for use in your class

From any of those links, there are lots of further links to explore the features of Teams.