A Necessary Trick in Teams for PowerPoint Presentation in Live Meetings

At the #KTeachDev2020 Live Session on July 22, I awkwardly tried to work around a little annoyance in Teams: when screensharing a PowerPoint window in a live call, Teams won’t let me see the chat or the list of participants. When using Teams to record lectures that isn’t a problem, but it is a deal breaker for live meetings because I need to see the chat and the list of participants to monitor the group for questions and raised hands.

Turns out there is a feature of Teams to address that problem: There’s a built-in PowerPoint presentation utility in Teams.

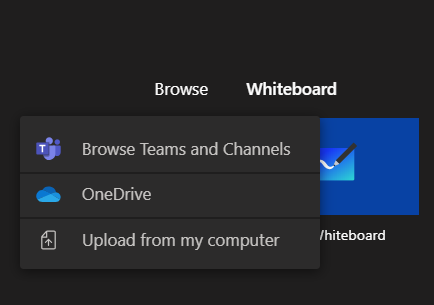
Once the meeting is running, select share screen and notice there is a place to select a PowerPoint file.

For me that doesn’t show anything right away, but when I select browse it gives me the opportunity to select my PowerPoint file “Upload from my computer”

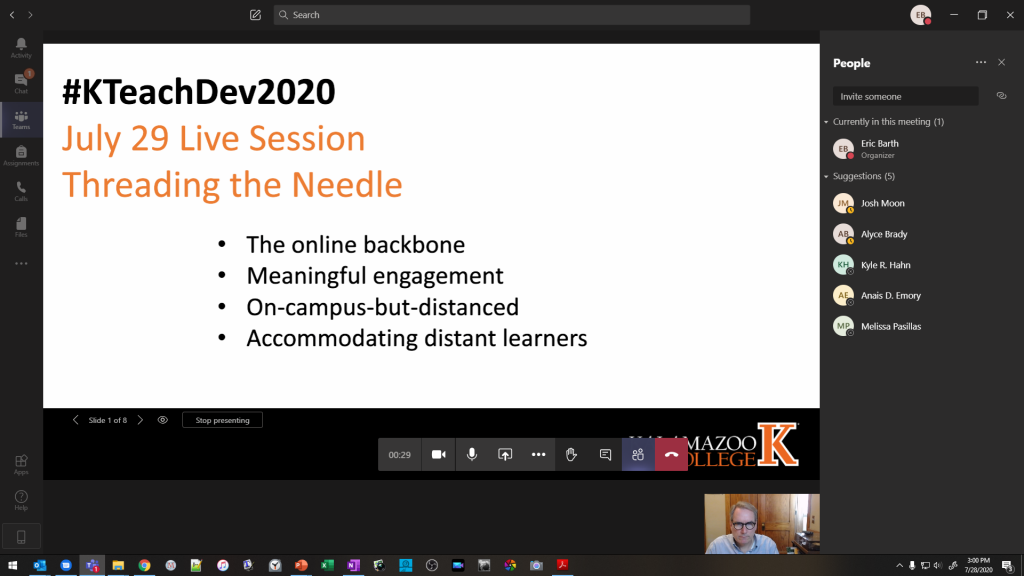
Once I’ve done that, my PowerPoint slides show up in the big window where video images usually appear, and all the other features of Teams (the menu ribbon at the bottom, chat and participants windows, etc ) are there waiting for me to use, as you see in the image below.

Here’s an external video from a great source with more details.

You need to be using screenshots — Rick Barth

In my communication workflow in this crazy online era, I have realized that I can often avoid a wordy description with a picture:

  • A formula or figure from some online source
  • A little piece of the student’s online submitted work I’d like to comment on specifically
  • A funny meme 🙂

I can make that happen with a screenshot. Often I just need to paste the result into a Teams chat (sorry, Zoom doesn’t allow that), an email, or a PowerPoint slide. I can also save the screenshot to an image file to use later. The process is easy for both macOS and Windows10.

Windows10

There are many ways to accomplish screenshots in Windows10. The slickest in my opinion is to flip a switch in Settings that allows the “Snip & Sketch” tool to be activated by the Print Screen button on your keyboard. You do this by going to the windows menu (lower left of you screen), selecting Settings (the gear icon) and searching for “print screen”. There’s a switch to flip: “use the PrtScn button to open screen snipping” as in the screenshot below.

turn on print screen button activation of the screen snipping tool
Turn on screen snipping tool in the Ease of Access menu in Windows 10

Once you’ve done that, press the Print Screen button and you’ll see the screen become a little bit greyer and a few buttons appear at the top center, allowing you to copy a rectangular region, a window, the whole screen. It remembers your selection the next time too.

snip and sketch toolbar ribbon
the snip & sketch toolbar ribbon

After you’ve made your screen shot, its ready to paste (CTRL V) wherever you want. Also, a little window opens in the bottom right of the screen. Clicking on that allows you to save the screenshot in a file, open it to edit, and a few other things.

macOS

There’s not much to say here. Push these three buttons simultaneously and the cursor will turn into a little crosshair that you can drag on the screen to get the rectangle you want to grab.

shift command 4
shift command 4

Here’s a webpage that goes into detail about screenshots on lots of devices.

Customize your background image in Teams

An important note: The steps below work for me in the Teams App on Windows 10. We’ve come to realize that different operating systems have different features and behavior. If you have a Mac, Chromebook, or use the browser-based Teams site, please let everyone know how/if this works for you in the comments below. Thanks!

The Teams platform is improving week by week, and custom background images have become so much easier to do. Here are the steps, in pictures:

Select the three dots in the menu ribbon
Select “Show background effects”
Select “+Add new”. You can then navigate to the image file stored on your computer that you want to use for the background.
press “preview” to see a little teaser in the left hand corner, or take the plunge and hit “Apply”
Me and my photo of the Neowise comet.

K College Background Image

Thanks to Noriko Sugijori and Craig Simpson, we have the attractive K-themed background image pictured below. Right click here and select “save link as” to save it to your computer.

Kalamazoo College Theme Background Image

Displaying An iPad Screen On a Mac (e.g., to embed a whiteboard in a recorded Teams meeting) — Alyce Brady

This 4 minute video describes the use of QuickTime to display an iPad’s screen on a Mac. The specific context that motivated this video was to describe one of several ways to share a whiteboard in a Teams meeting, especially if you want to record the meeting for students to refer back to. (At the current time, the Microsoft Whiteboard app will not get recorded in Teams meeting recordings.)

The tl;dr version of this is to

  • connect the iPad to the laptop with the appropriate cord,
  • bring up QuickTime on the laptop,
  • choose New Movie Recording,
  • choose “iPad” from the pull-down menu next to the red Record button,
  • but do not start recording.  This will display the iPad screen in the Mac’s QuickTime window, which you can share in Teams using screen sharing.

Alternate Version

A different approach is to start a Teams meeting on your laptop, bring up Teams on the iPad also and join the existing meeting.  You will now be in the meeting twice, from two different devices.  (Make sure to turn the microphone and speaker off on one of the two devices.)  Choose to Share from the iPad (under the “…” option), then switch to whatever app you want to share from the iPad.  As always, you can record the meeting from the laptop.

Sharing Handwritten Work using OneNote and a USB Tablet with my MacBook — Eric Nordmoe

Here’s a short screencast that shows how I prepare handwritten online lessons. Most of the statistics software I use in class doesn’t work so well on an iPad. That means I’m committed to using a computer (in my case a MacBook Pro.) I wanted to incorporate handwritten work with that setup. In this short video I show you how I do that using Microsoft OneNote and a USB Tablet. OneNote is included in the College’s Microsoft license. I recorded this video screencast using Screencast-O-Matic.

A 5-minute Video by Eric Nordmoe

Links to the items I mention here:
• Screencast-O-Matic
• My Wacom Tablet

Math Symbols in Moodle

I know, it isn’t for everyone. But if you need to typeset a math symbol, you need it to be easy to enter and correctly formatted. Moodle has a built-in capability to interpret math symbols using the LaTeX typesetting language.

All that’s needed are double dollar signs, like in this little example: I created an assignment call “latex sample” and typed the following in the assignment description:

The coefficient of $$x^2$$ is $$\pi$$.

That displays in Moodle as

If you aren’t familiar with LaTeX:

Here is my top-ten list of most needed LaTeX symbols.

  1. Subscripts use _ (underscore): $$a_1$$, $$H_a$$, $$k_s$$, etc
  2. Exponents and superscripts ^ (caret): $$x^2$$, $$e^x$$, etc
  3. Greek letter are preceded by \ (backslash): $$\pi$, $$\alpha$$, $$\mu$$ etc
  4. Fractions use a special construct: $$ \frac{ }{ } $$ For example “pi over 2” would be entered as $$ \frac{\pi}{2}$$
  5. Numbers and lots of symbols correspond to their typical keyboard symbol: prime = apostrophe, absolute value = vertical bar on backslash key $$ |x| $$, parens = (), as well as the operators +, –
  6. Integrals use the construction $$ \int $$, for example $$ \int_a^b f(x) dx $$
  7. Multiplication: use \cdot like this $$ x \cdot x^2 = x^3 $$
  8. If you want an old-fashioned “multiply by” symbol, use $$ 3 \times 2 = 6 $$
  9. If you want an old-fashioned “divided by” symbol, use $$ 6 \div 2 = 3 $$
  10. Beware of Percent Sign and literal Dollar Sign: They need to have a backslash $$ 21\% $$ and $$ \$21.99 $$.
  11. As suits this extra tip: infinity is entered with this sad misspelling: $$ \infty $$.

For more information, here’s a complete glossary of math symbols in LaTeX

The Simplest Way to Record Video Lectures up to 15 minutes: Microsoft Stream

Everybody at the College has access to a suite of Microsoft programs. Among them is a video sharing platform called Stream. The built-in capabilities of that program make it the easiest way I’ve found to record a video lecture that includes a picture-in-picture webcam video of you presenting the lecture. The one limitation to be aware of: the platform has a limit of 15 minutes for these kinds of recordings. That isn’t a problem in my view/ A prepared video lecture can get your message across in that time, and students report that longer video lectures are hard to digest. Below is a quick 5-minute video that shows the process from beginning to end.

Click here to learn more about Stream.