If you already use MS Outlook to manage your calendar, there’s a new app called Bookings available in our MS Office suite. Bookings allows students to sign up for meeting times based on your availability at Outlook. Here’s an 8-minute video screencast that shows the steps I used to set up my advising schedule. If you don’t have 8 minutes, scroll down for a few notes, obstacle warnings, and instructions from Josh Moon. You can also take a look at his own Bookings calendar!
Josh’s Notes:
Bookings works best if you use Outlook and/or Teams to keep track of your calendar. Bookings will sync and “talk” to those Microsoft Campus systems. You can use it independently, but you’ll want a plan for managing your availability.
Bookings and its language is optimized for organizations and groups with multiple staff members, but an individual can also use it to let people book time on their calendar. There are faculty and staff already using it successfully in this manner.
If you select the default Availability setting, appointments will be available whenever you are free on your calendar. You can further limit this by introducing “Custom hours” in the General Availability settings. You can also set a different availability over a particular date range, for example during Advising Week.
“Services” can be 1-on-1 or Group. However, “Group” means that multiple separate individuals can access the same time slot, as in for a webinar or training. If you want only one person or even one group to access a single time, choose 1-on-1. Once you have a “Group” service, you cannot change it to 1-on-1!
If you want the cost information to be omitted from your page all together, select “Price not set” instead of “Free.”
The default scheduling page will ask for the person’s name, email, address, and phone number. You can remove and add fields as you like. For example, you might create an option to pick between a Teams and in-person meeting.
Bookings Steps for Advising Week Meetings:
Log in to Office.com
Select Bookings from the Apps.
Create a Bookings calendar.
Add a “Service” for your advising schedule
Fill out the settings for your “Service”.
Choose how long a default appointment should last and whether you want a buffer time.
Example: Meetings of 25 minutes + a five-minute buffer after, and your available appointments will look like:
2:00 – 2:25pm
2:30 – 2:55pm
3:00 – 3:25pm, etc.
Availability options
For the general availability, choose “Not Bookable.” It’ll be okay!
Then, “Set a different availability for a date range” and choose your window of dates.
If you don’t want Bookings to allow appointments any time you are available, set more custom hours.
“Save changes”, then copy the link to the new service and share it with your advisees!
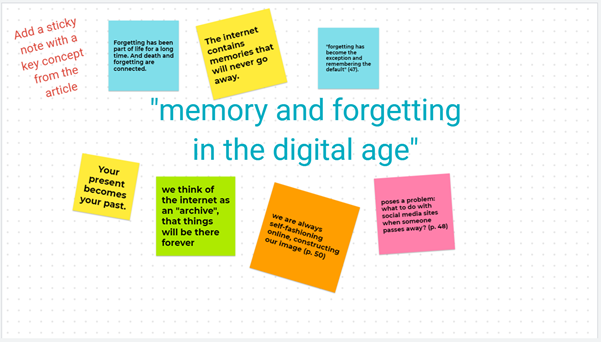
I know, I know…you’ve heard about a million different tech tools to be used for online teaching –and you’re overwhelmed. But I promise you, this one is worth checking out. It’s called Jamboard, and it’s a Google collaborative tool like Google Docs or Slides. Jamboard is basically a fancy digital whiteboard. Share your screen, and you can write terms, draw, share images, and share text. If you share the link, students can add post-it notes (anonymously!). You can also add images from the internet or from your computer to be annotated. Jamboard is also a great way to structure small group work, and observe how students are doing in real time.
There are many ways to use this tool. Dwight Williams already wrote about using Jamboard for Whiteboarding with Organic Chemistry students. I have used Jamboard in my first-year seminar to get discussion started, or to guide group activities. For example, students brainstormed initial ideas based on the reading by adding “sticky notes.” We also workshopped “what makes a good thesis statement” – students posted their thesis anonymously and we talked through and then edited them together. In German class, I have posted images and had students brainstorm vocabulary, or collaborate to write stories together.
Here is another sample from my seminar (Link to Jamboard), for how to use Jamboard to structure small-group discussion. Each slide had either a discussion question based on the reading, or a blank slide that asked students to answer the question with a sticky note.
You can make the Jamboard view-only (similar to Google Slides) if you want to present; or you can give students editing privileges for collaboration.
There is no revision history or way to “revert” to original. If you are giving students the link and editing privileges, you may want to save a backup if you plan to re-use the Jamboard.
It is very easy to “duplicate” slides and to copy the presentation. For group work, you may want to give each group their own slide to edit, or you may want to copy the whole Jamboard and give it to different groups. I have found it also works well for students to go through the Jamboard at their own pace, with different discussion questions on each slide.
Take advantage of the anonymity, or allow students to write their name on a post-it. I mostly used the anonymous posting tool in my classes.
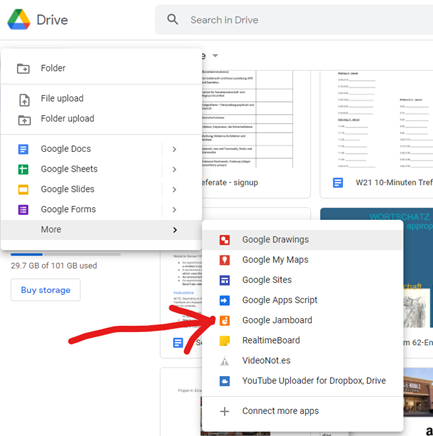
How to find Google Jamboard via Google Drive (it’s under “More” below Docs, Sheets, Slides, and Forms):
Further inspiration/links:
John Sowash, 5 Simple Jamboard Lessons (I especially love the examples of the “brain dump” and “annotation station” here)
A terrible movie called “Click” came out ~15 years ago. The whole plot revolved around Adam Sandler discovering a remote control that allowed him to pause or fast forward real life. As someone who spills coffee and instinctively makes finger movements to hit the ‘command’ and ‘z’ keys (control-Z for PCers), I’ve always wanted that remote. This tool may be the closest we’ll ever get.
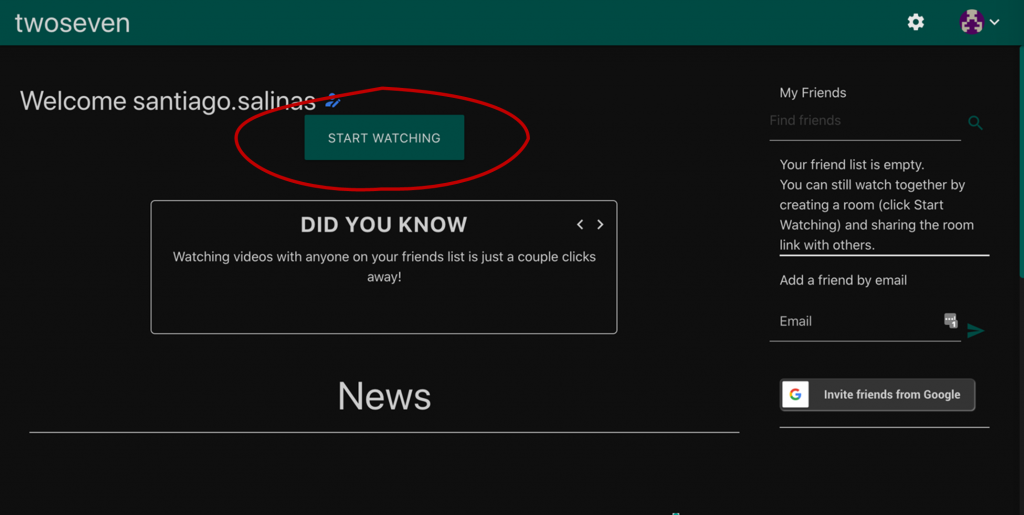
The website is called twoseven (twoseven.xyz). It allows people to watch videos together, synced, while texting or video-chatting, and it’s one of the more straight-forward and free options I’ve tried. You provide the site with a link to the video (e.g., lecture), your friends with a link to join you on twoseven, and that’s it.
Why was I looking for that kind of tool? Well, I like classrooms that are just a tad loud and all over the place. I ask questions and stop for a minute or two until students think of answers. I encourage interactions among students if they don’t disrupt others. I enjoy when students make nerdy jokes about vertebrates. I was looking for a way to simulate that communal feeling while my young biologists were watching lecture videos.
1. After creating an account, go to “Start Watching”
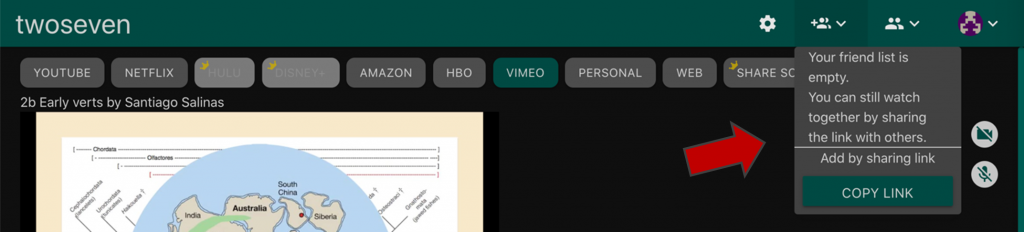
2. Make sure you have the right source selected at the top (e.g., Vimeo) and enter your link address
3. To invite others, all you do is get a link and share it
4. You are now ready to watch a lecture and pass virtual papers to your neighbors with the chat function!
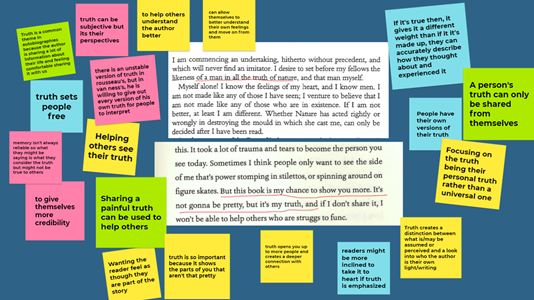
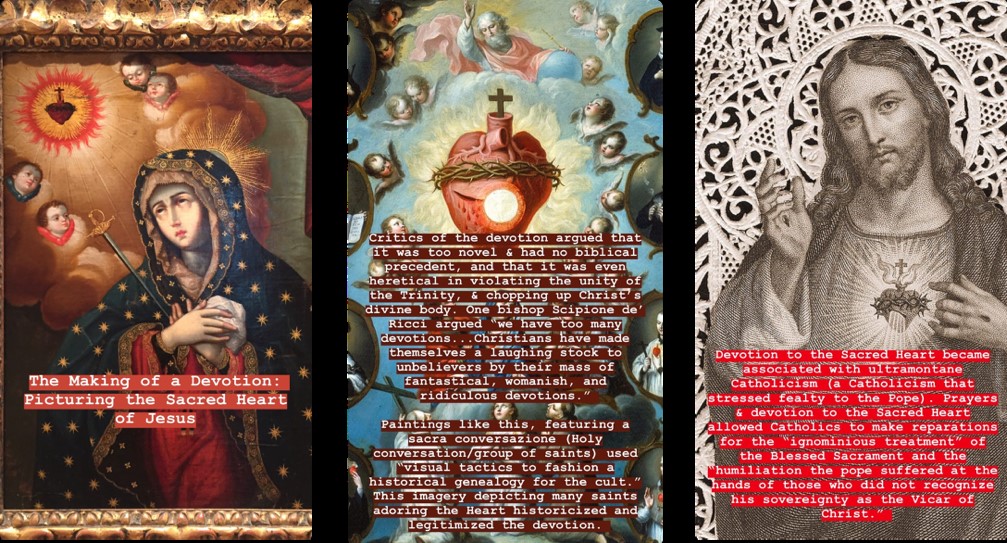
Here I share how I used Instagram as a replacement for slideshows and more traditional Moodle posts, allowing students to engage aesthetically and analytically with course materials in ways that felt personal and accessible.
I’m sure we all have salient memories of March 13, that final day of classes at K when we knew coronavirus was looming, when we were just wrapping up the Winter term, completely unsure of what was to come. We had just begun carrying around little bottles of hand sanitizer with us, masks were not yet a thing. Maybe we had a pack of Lysol wipes in our offices. Our students sat close together, sharing bagels and iced coffees. We stood close together in the library elevator. At the end of my morning class, not knowing when they were going to see me again on campus, a couple of students asked if we could give me a hug. They were the last people I hugged outside of my family.
That morning students in my Religion and Masculinity class were chatty and restless as we sat in our library classroom. Rather than discuss the reading for that day on the intimacy of 19th century men’s studio portraits, we spent the class time imagining what an online class at K might look like. The first things my students dreaded was having their only meaningful interaction with course texts be through Moodle posts. My brilliant colleague, Ambre Dromgoole, a PhD Candidate at Yale, had tweeted a few days prior about using Instagram Live in lieu of other lecture-delivery platforms. I loved the idea of using Instagram and floated it by my students. Instantly they agreed that it would be fun and accessible to use social media for classes. I was preparing to teach my Catholics in the Americas class in the Spring. Usually my slideshows at the start of each class are full of Met Gala costumes, skulls, bones and other macabre relics, cathedral interiors, statues, woodcut images of burning convents, festivals, and processions. A course on Catholicism begs for visual richness and interactions with objects, architecture, and art. Instagram is the perfect platform for students to think about the relationship between tradition, practice, texts, objects, and images.
As I told my students, Catholics are EXTREMELY ONLINE, by which I mean many of them use social media, whether that be Instagram or Twitter to share dimensions of their religion, to post images of saints and rosaries, prayers, and increasingly the internet and social media platforms have become a media of presence. Blessings and the presence of Christ can travel through computer screens and Twitter posts. Just before the Spring term began, on March 28, 2020, Pope Francis delivered the Urbi et Orbi [to the city and the world] Blessing to an empty St. Peter’s Square. In the blue glow of night tens of thousands of people all over the world tuned into a livestream. Catholics watched as the Pope adored the Blessed Sacrament, and as he walked out onto the square in the rain holding the gold monstrance with the body of Christ at its center. This was not simply a symbolic gesture, but an efficacious one. From the square, through the cameras, through thousands of screens Catholics were not only blessed, but could receive a plenary indulgence, a remission of temporal punishment for sin, if they tuned in by internet, radio, or television. In short, the internet, social media platforms, and other digital media technologies are central to how Catholics stay in touch with Rome, with each other, and are essential to contemporary devotional culture and practice. So Instagram seemed the perfect way for students to engage with historical and contemporary Catholic culture, and curate their own images to go with their thoughts on the readings and materials each week.
Every student was required to make a new Instagram account that they would use just for class—to minimize the awkwardness of using their personal accounts, and I too made an account that was private and just for class use. On their account they would post weekly in response to the readings, films, or sources for that week. Each week they would post what I called a “Virtual Provocation:”
These posts should include a reflection on something that interests you in the day’s readings and questions for discussion. Your post can be a combination of your own thoughts and quotes, passages, images, memes you have made, media clips etc.
Use these posts to raise provocations—what stood out to you? Can you make connections with other texts, examples, classes, events etc.? Did something in the text jog your memory? Do you take issue with any of the author’s arguments? Why? These should help jump start discussion and you should read and comment on each other’s posts as well. Posts should raise substantive issues rather than noting minor curiosities or posing purely informational questions. These will demonstrate your engagement with the texts and themes.
For this kind of assignment, fewer guidelines helped the students find their own voice and style. K students, creative, curious, independent thinkers that they are, rose to the challenge and I was delighted with how thoughtful their posts were. In response to videos, readings, and primary sources, students would select an image—sometimes this was a family photo, a picture from their time abroad, a painting, a building, a devotional image etc.—and their caption would contain their response to the readings. They knew these would be read by me and others, so it was the perfect place to ask questions, quote the text, and voice their own perspectives on the course readings. Sometimes these were personal, as students who had gone through Communion and Confirmation themselves, or went on pilgrimages, shared how the text complemented, complicated, and illuminated their own religious histories and experiences. Often these were critical, when they were voicing frustration with an author’s argument or critiquing missionaries and their role in colonization, or the Church’s theology of gender and sexuality, or the entanglement of religion and politics. I found these posts were of much higher quality than any Moodle posts had been in past classes, perhaps because of the reflection and thought required in pairing text and image, or the accessibility of the technology and their ease with the platform. For me, reading their posts was as simple as scrolling my feed, something I would do naturally. Due the night before our synchronous discussions, these posts were useful as I prepared discussion questions, and helped me prompt students to share their ideas and stories. The posts helped me create personal connections with students who I had never met in person, allowing me to learn their voice, and their unique perspective on the world. This made what could sometimes be awkward video chats run smoothly and much like an in-person class discussion would. Students would read each other’s posts and be ready not just to talk to me, but with each other about the materials, and they really enjoyed the use of social media for distance learning. Some student comments:
“Instagram was used so well!!! I don’t know if you have been considering this yet, but when you go back to in person you might consider still using it. That was really amazing.”
“The class platform was super enjoyable – connecting over social media to post provocations and other interesting things. That was super different and exciting, not to mention creative on Dr. Maldonado’s part.”
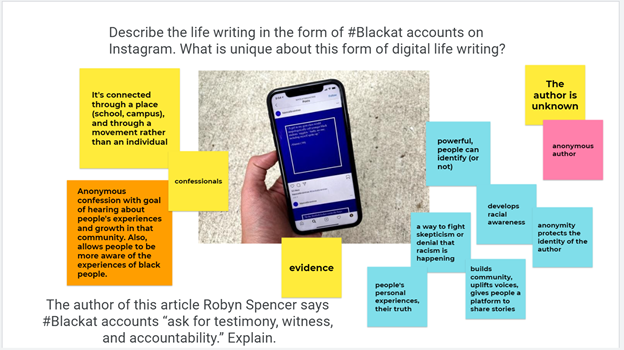
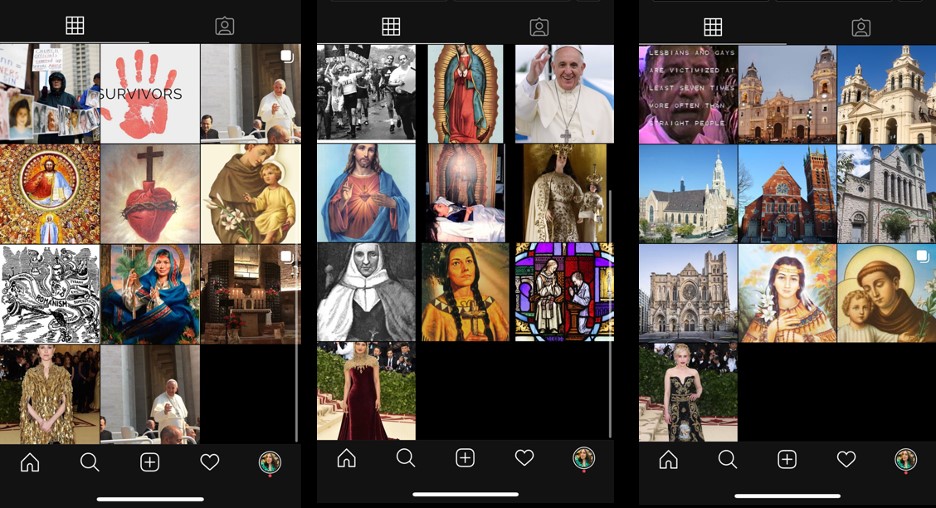
Some samples of student profiles:
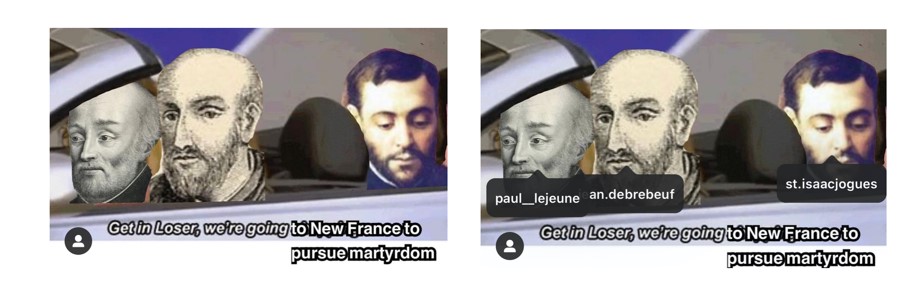
Some students made memes, which takes a deep understanding of the material, and I love the remixing of old and new media forms. In the one below, a student thinks about Jesuit’s glorification of martyrdom in New France in their missionary work with the Iroquois. The student even tagged each of their Instagram accounts in the meme.
In the pandemic, sometimes with shoddy WiFi, or devices shared between multiple siblings, it is important for students to be able to access course materials and even engage in course requirements on their phones. If I feel like I have low bandwidth for watching videos and other recordings, students might too. Instagram stories became a perfect way for me to deliver background content and share visual media with students without the need for video streaming or even sharing or downloading attachments. They could casually click through an Instagram story wherever they might be, and at whatever time of the day they find time. About once a week, I used Instagram stories in lieu of PowerPoint to create stories that students could click through to learn about historical background and context, whether that be the origins and development of devotion to the Sacred Heart of Jesus, anti-Catholicism in the 19th century, violence between Protestants and Catholics, or why saints are so important. I prioritized choosing a compelling image for each slide. I then typed out a couple of short sentences to go along with the image—slotting lecture notes right into a slide won’t work as each needs to be easy to read and minimal. Attention to color, contrast, font size is important for readability too. Just seeing these images helped build a familiarity and facility with Catholic iconography and material culture, an important part of this course. An example of a cover slide and two informational slides:
Using Instagram helped students not only understand Catholic objects, spaces, and aesthetics (and learn that Catholicism is about much more than the hierarchy and theology), but also learn and display facility in how to discuss them. They were able to think critically about representation and practice, and about the pervasiveness and diversity of Catholicism in their towns, cities, and online worlds. I found it to be an equitable way to share content and have students engage in the course and contribute their own thoughts using only their phones. The flexibility and creativity of this platform and their facility with posting and viewing text and images in this way yielded strong work, critique, and analysis in ways that directly fed into our class discussions. More, this platform pushed me to consider how to deliver information in bite-sized and visually interesting ways, and it helped me connect with my students outside of learning management software. It met me where I was and met them where they were. I imagine these kinds of posts and stories could work well for a variety of disciplines to help students connect in meaningful ways with class materials and develop and share their own written perspectives, questions, and critiques.
In this video blog I share my thoughts on how I’ll use digital whiteboarding in my class this fall. I teach organic chemistry, a discipline that is rooted in drawing chemical structures — lots of pictures! To help students understand this discipline, its helpful to do this work together. I plan to run my class in a semi-synchronous fashion, interacting with students in real time using Google Jamboard.
In my communication workflow in this crazy online era, I have realized that I can often avoid a wordy description with a picture:
A formula or figure from some online source
A little piece of the student’s online submitted work I’d like to comment on specifically
A funny meme 🙂
I can make that happen with a screenshot. Often I just need to paste the result into a Teams chat (sorry, Zoom doesn’t allow that), an email, or a PowerPoint slide. I can also save the screenshot to an image file to use later. The process is easy for both macOS and Windows10.
Windows10
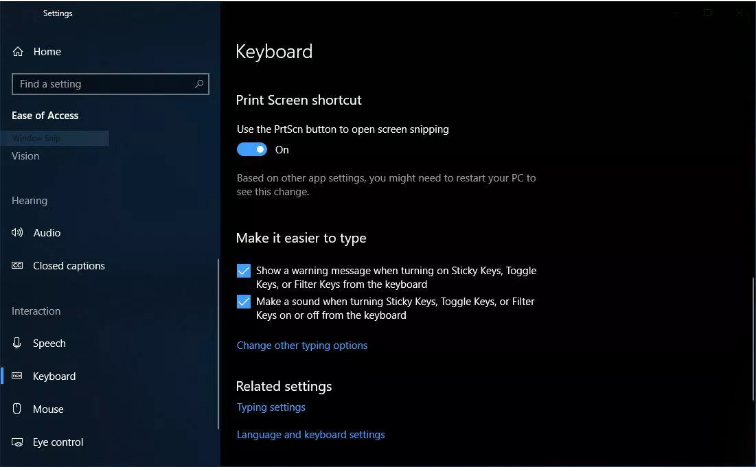
There are many ways to accomplish screenshots in Windows10. The slickest in my opinion is to flip a switch in Settings that allows the “Snip & Sketch” tool to be activated by the Print Screen button on your keyboard. You do this by going to the windows menu (lower left of you screen), selecting Settings (the gear icon) and searching for “print screen”. There’s a switch to flip: “use the PrtScn button to open screen snipping” as in the screenshot below.
Turn on screen snipping tool in the Ease of Access menu in Windows 10
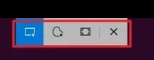
Once you’ve done that, press the Print Screen button and you’ll see the screen become a little bit greyer and a few buttons appear at the top center, allowing you to copy a rectangular region, a window, the whole screen. It remembers your selection the next time too.
the snip & sketch toolbar ribbon
After you’ve made your screen shot, its ready to paste (CTRL V) wherever you want. Also, a little window opens in the bottom right of the screen. Clicking on that allows you to save the screenshot in a file, open it to edit, and a few other things.
macOS
There’s not much to say here. Push these three buttons simultaneously and the cursor will turn into a little crosshair that you can drag on the screen to get the rectangle you want to grab.
This 4 minute video describes the use of QuickTime to display an iPad’s screen on a Mac. The specific context that motivated this video was to describe one of several ways to share a whiteboard in a Teams meeting, especially if you want to record the meeting for students to refer back to. (At the current time, the Microsoft Whiteboard app will not get recorded in Teams meeting recordings.)
connect the iPad to the laptop with the appropriate cord,
bring up QuickTime on the laptop,
choose New Movie Recording,
choose “iPad” from the pull-down menu next to the red Record button,
but do not start recording. This will display the iPad screen in the Mac’s QuickTime window, which you can share in Teams using screen sharing.
Alternate Version
A different approach is to start a Teams meeting on your
laptop, bring up Teams on the iPad also and join the existing meeting. You will now be in the meeting twice, from
two different devices. (Make sure to
turn the microphone and speaker off on one of the two devices.) Choose to Share from the iPad (under the “…”
option), then switch to whatever app you want to share from the iPad. As always, you can record the meeting from
the laptop.
Here’s a short screencast that shows how I prepare handwritten online lessons. Most of the statistics software I use in class doesn’t work so well on an iPad. That means I’m committed to using a computer (in my case a MacBook Pro.) I wanted to incorporate handwritten work with that setup. In this short video I show you how I do that using Microsoft OneNote and a USB Tablet. OneNote is included in the College’s Microsoft license. I recorded this video screencast using Screencast-O-Matic.
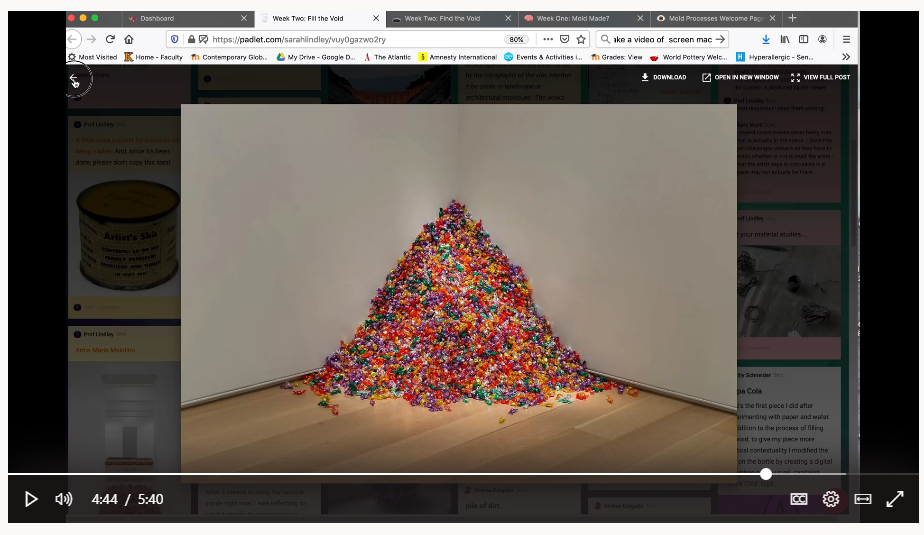
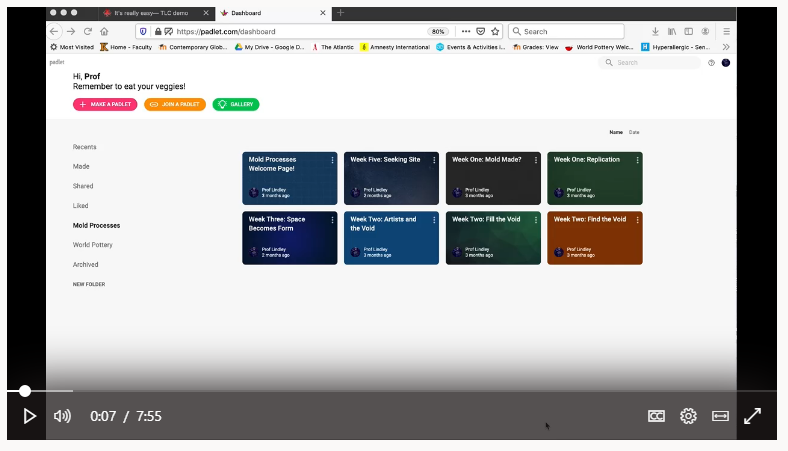
Lots of people wonder how it would be possible to teach ceramics and sculpture online. It turns out that giving up the messy materials of clay and plaster was less disruptive than losing the group discussion and shared workspace that are essential to a sense of community and rapid artistic growth. This 5-minute video shows how I used the interactive platform of Padlet to introduce assignments, emulate a shared workspace environment, and foster asynchronous discussion. Padlet is colorful, easy to use and edit, and encourages creativity. It’s also nonlinear (unless you want it to be), and nonhierarchical. I used my own $10/month account to create all the Padlets, which meant students were able to use a free account for the entire term.
How I used Padlet in my courses. A 5-minute video by Sarah Lindley
Watch this 8-minute “how to” video to see how easy it is to start using Padlet and visit the Padlet from the video to see how it works.
Getting started with Padlet. An 8-minute video by Sarah Lindley
I don’t like the ads and lack of security with Youtube, so I tried using Vimeo for streaming videos at the beginning of the term. After some consultation with the Amazing Josh Moon, I realized that Streams was easier and better than Youtube, because
you can create the video so it is available to the entire college community, just your class, or just a few people
you can see how many times the video has been viewed
Streams automatically develops text captions for the narrative
no ads
no subscription fee
Alternatively, I also found OneDrive to be very useful for short videos. OneDrive tells you WHO watched the video. That was helpful for having keeping track of engagement.