Using Flipgrid for Asynchronous Video Discussions — Leihua Weng

I used in my language classes in the Fall “Fligrid,” an app/website provided by Microsoft. It is a video app that instructors can use to assign asynchronous video discussions to students. It worked for me as a nice supplement to Moodle since Moodle can hardly accommodate any video discussions. I discuss here my experience of using it in my CHIN101 course, but I think it could be employed in other language or content classes for asynchronous discussions.

Flipgrid has some nice features that I appreciate a lot:

  1. You can include media files in the prompt.
  2. Students can join the discussions using the comment function, either in text or in video or in both.
  3. You can join the discussions as students do,  and even more— you can provide private comments to individual students.
  4. You can use basic or custom rubrics for feedback and grading.
  5. You can export data for each assignment.
  6. And it is FREE for both educators and students!

The following is a brief summary of how I used Flipgrid in CHIN101 Fall 2020. As I am still new to Flipgrid, the summary is definitely not exhaustive and it is intended to serve as a reference only.

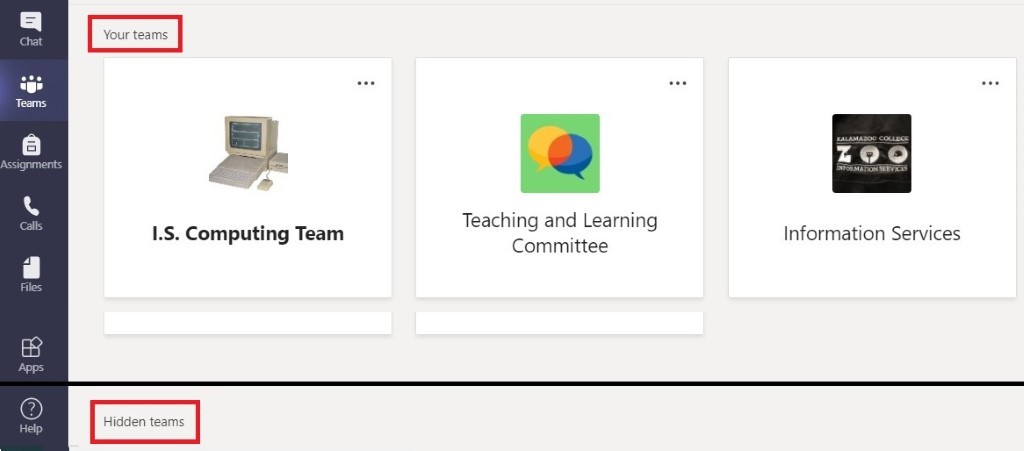
  • I asked students to register on Flipgrid with their school account and then limited the access of Flipgrid assignments to the users of “Kzoo.edu.” I feel more comfortable to have certain degree of privacy protection for my classes in an external online learning platform than otherwise.
  • Students can choose to click the embedded webpage link on Moodle or to open the Flipgrid app in their cellphone or tablet, with the passcode I provided.
I embedded the Flipgrid assignments in a Moodle page.
  • I can organize prompts in groups.  
  • I used the Flipgrid in both language classes last quarter, much more frequently in one than in the other. However, Flipgrid received more positive reviews from the class that used it less. So I conclude that Flipgrid could be a nice supplement to the discussions on Moodle; however it could be overwhelming as video discussion is generally more time-consuming than a discussion in text.

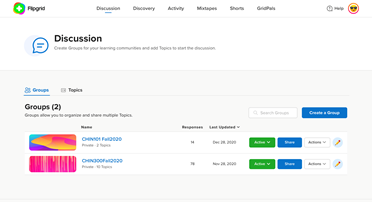
This is what I have in my educator dashboard in my iPad Flipgrid
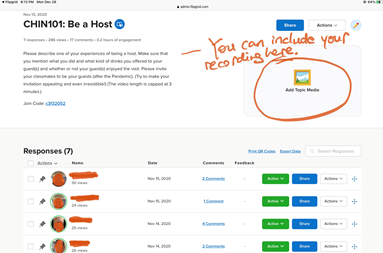
  • To the right, there is an option to include your lecture recording. It could be useful if you want to organize asynchronous discussions around your recorded lectures.
  • I asked students to respond to each other’s video posts by certain time. And I also made sure I responded to each post. You can see each post received at least one comment.
Here is a screenshot of students’ input
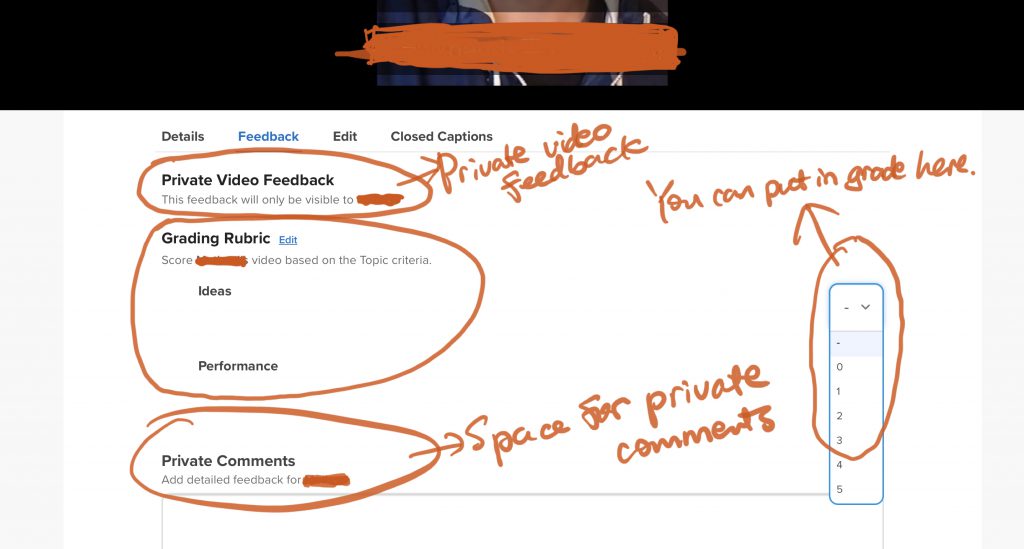
  • There is an option of proving “private video feedback” in addition to open comments that are visible to everyone.
  • There are two sets of grading rubric, one basic; the other custom.
There is a grading function
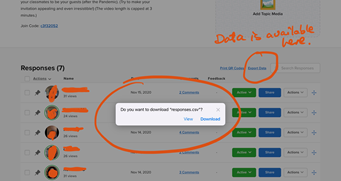
  • The function of data exporting could be helpful as we could track how much, how frequent, and at which time a student participates in a discussion.
Data is available to export

I feel I so far have explored only a small part of Flipgrid for language teaching. I will use it in my literature course this Winter. I may be able to come back to update or to revise what I put above. Please contact me via Leihua.Weng@kzoo.edu if you would like to explore this application with me. Thank you.

Class Teams from Quarter to Quarter — Josh Moon

In addition to Moodle and other resources, many instructors have adopted Teams to organize their online classes.  Teams is designed to put de-centralized control in the hands of owners and users. While offering support and training, this has been the spirit that Information Services has maintained for using Teams. Now that we’ve completed two quarters using this platform, we wanted to share some thoughts about carrying over work on Teams from quarter to quarter.  

My List of Teams 

As we move from quarter to quarter, faculty should consider how best to manage their growing list of Class Teams. This would include whether to maintain, hide, or delete a particular Team.  Faculty are also encouraged to practice naming conventions that clarify the term of each site to avoid ambiguity.  The convention in Moodle is Department/Course Number/Term (i.e. PSYC 101-02 FA20).   

To Hide, Delete, or Do Nothing 

It is helpful to know what these options mean in terms of Terms.  If you do nothing with your Team, it will remain visible and available to members in the main “Your Teams” section of the Teams menu.  Individual users can choose to hide any of their teams regardless of their Permissions.  This moves the Team to the “Hidden Teams” section of the bottom of the Teams menu but does not restrict access or hide content.  

Deleting a Team 

Deleting a Team eliminates the Team within the app, the associated Office 365 Group, and the SharePoint site that serves as the backbone to host files and other features.  In other words, deleting a Team gets rid of everything.  

Leaving a Team 

One difference between a Class Team and other formats (PLC, Staff, etc.) is that it is more difficult for Members (students) to leave a Class Team. Currently, members can only leave Class Teams via the app on an Android device. The option will not appear for a Team on the web interface or the desktop application.  This is a current Microsoft coding quirk.  

Duplicating a Team 

If you are re-using a Team’s format (Channels, Tabs) and content (Files) as the template for your next course, you can duplicate that material into a new Team.  Remember, any user at the College can create a Team by clicking “Join or create a Team” in the Teams menu.  Once you have selected which type of Team you wish to create, “Create a team using an existing team as a template” will appear as an option at the bottom of the “Create your team” window.  You will have choices whether to duplicate the Tabs, Settings, associated Apps, and Membership.  “Members” will be unchecked by default to welcome a new course roster.  You’ll need to rename your new Team as well.  


Note: This procedure will not import the Files from you previous Team! While it’s intuitive to drag your course files and readings into the “Files” section of your Team, Microsoft’s intention is for your readings and other course files to be deposited in the “Content Library” section of your Class Notebook. While this requires spending time getting comfortable with Microsoft OneNote, it might be a beneficial step if you are planning on using Teams in your class extensively. Visit the the page on Using the OneNote Class Notebook to get started. Class Notebooks can be imported from one Team to a new one, taking with them the Content Library and other material.

If you already have your documents for the course in a Files tab, you can copy those files to a new Team. Access the Files Tab in a Channel, select the Files you wish to copy, and click “Copy.” This will open a navigation window where you can find the Team where you want to copy the files. Currently, whole folders cannot be copied at once. You can, however, create folders in the destination Team first to receive copied files.


Some thoughts on Managing Your Teams 

Hiding inactive or older Teams can be a useful technique for maintaining archival access to course content and conversations while keeping the “Your Teams” menu efficient and organized.  If you’ve ever wished you could easily return to contact or communicate with members of a previous class, this could be one solution.   

If you want to prevent students from returning to the course Team without deleting it, you could remove all the members from the Team.   

As a reminder, we have created a Teams-specific feedback form (login required) to field your questions and respond to challenges.  As the College’s use of Teams evolves, we’re interested to hear from you so that we can better support and organize this platform at Kalamazoo.  Don’t hessite to talk to us about Teams! 

The gist of the paragraph is: management of Teams is decentralized; faculty that have created Teams for a term-specific class should consider whether they want to maintain or delete it, should consider naming (or renaming) the Team to be term specific so future iterations of the same class don’t become ambiguous, etc. 

This information is also contained in an Information Services Announcement.

Granting Access to Your Stream Videos

After you upload your video to Streams, you need to choose who will be able to access it. You can allow any user with a kzoo.edu account to see it, or you can limit access to individuals or groups of your choosing. Perhaps the most common way to do that is to grant access only to members of a Teams Channel—like for your course!

This 2-minute video demonstrates what you need:

If you want to bypass the video, here’s the step-by-step in pictures

A Team Meeting about Joining and Running Team Meetings – Alyce Brady, Josh Moon, and Rick Barth

Everything You Wanted to Know About Teams but Were Afraid to Ask!

This video features a meeting in which we discuss how to start or join a meeting in Microsoft Teams, how to participate through features such as raising a hand, muting and unmuting video or audio, or chatting on the side, how to share your screen, and how to record a meeting.  We also talk a little bit managing meetings and how the Meet feature integrates with other Teams components.

Getting Started with Teams for Your Class

Here are a selection of short videos from Microsoft showing some initial steps for getting Teams going for use in your class

From any of those links, there are lots of further links to explore the features of Teams.

A Necessary Trick in Teams for PowerPoint Presentation in Live Meetings

At the #KTeachDev2020 Live Session on July 22, I awkwardly tried to work around a little annoyance in Teams: when screensharing a PowerPoint window in a live call, Teams won’t let me see the chat or the list of participants. When using Teams to record lectures that isn’t a problem, but it is a deal breaker for live meetings because I need to see the chat and the list of participants to monitor the group for questions and raised hands.

Turns out there is a feature of Teams to address that problem: There’s a built-in PowerPoint presentation utility in Teams.

Once the meeting is running, select share screen and notice there is a place to select a PowerPoint file.

For me that doesn’t show anything right away, but when I select browse it gives me the opportunity to select my PowerPoint file “Upload from my computer”

Once I’ve done that, my PowerPoint slides show up in the big window where video images usually appear, and all the other features of Teams (the menu ribbon at the bottom, chat and participants windows, etc ) are there waiting for me to use, as you see in the image below.

Here’s an external video from a great source with more details.

Customize your background image in Teams

An important note: The steps below work for me in the Teams App on Windows 10. We’ve come to realize that different operating systems have different features and behavior. If you have a Mac, Chromebook, or use the browser-based Teams site, please let everyone know how/if this works for you in the comments below. Thanks!

The Teams platform is improving week by week, and custom background images have become so much easier to do. Here are the steps, in pictures:

Select the three dots in the menu ribbon
Select “Show background effects”
Select “+Add new”. You can then navigate to the image file stored on your computer that you want to use for the background.
press “preview” to see a little teaser in the left hand corner, or take the plunge and hit “Apply”
Me and my photo of the Neowise comet.

K College Background Image

Thanks to Noriko Sugijori and Craig Simpson, we have the attractive K-themed background image pictured below. Right click here and select “save link as” to save it to your computer.

Kalamazoo College Theme Background Image

Goodbye Emails, Hello Teams Chat — Nayda Collazo-Llorens

The Chat option in Microsoft Teams turned out to be an effective way to communicate with students, to the point that we decided to use it instead of email communication.

It offered casual and immediate exchanges (many of us installed Teams on our phones) and I would usually reply right away. It was convenient for students in both my Basic Drawing and Digital Art classes to reach out to me, or to the rest of the class in the group chat we set up early on, with questions as they worked on their projects.

Drawing students could send pictures of their in-progress drawings for feedback. Digital Art students were able to ask questions which would often lead to an impromptu video chat in order to share their screens with me.

It allowed me to see what they were working on and either help with technical issues or offer feedback. I found Teams Chat to be efficient and timesaving, but most importantly I felt it was the closest thing to being together in a studio classroom where I am there to answer questions and help students as they worked on their projects. It was also a quick and easy-to-use tool for me to reach out to students and was surprised by their prompt replies.

Both courses were taught asynchronously and incorporated different platforms. Moodle served as the main repository of information while Padlet served as an interactive collective space (see Sarah Lindley’s post). We also held optional Zoom meetings every week and I found that reminding students of the meeting through a chat message a few minutes prior offered good results.