We’ve heard many requests to help students submit video content to their instructors with College resources. Microsoft Stream provides a place for students to upload large video files and control who has access to them. Think of it as a private, Kalamazoo College YouTube where you pick who gets to see your videos. Click here to learn more about Stream.
First, let’s talk about making the videos. If students are creating a video elsewhere, like in an editing lab or on their personal device, they can upload a pre-made video to Stream. To do this, one member has to log in to Microsoft Stream and upload the video. We’ll talk about sharing that video with others in a moment.
Let’s assume they want to use Teams and a group Call to make the recording. This involves a few simple steps inside Teams. One group member can start a new Chat with two or more participants. Invite the participants and hit Enter.
Once everyone is ready, click the Call button in the upper right.
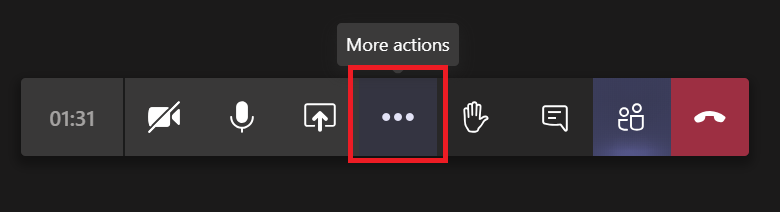
Have one participant initialize the recording by clicking More Actions… in the Menu
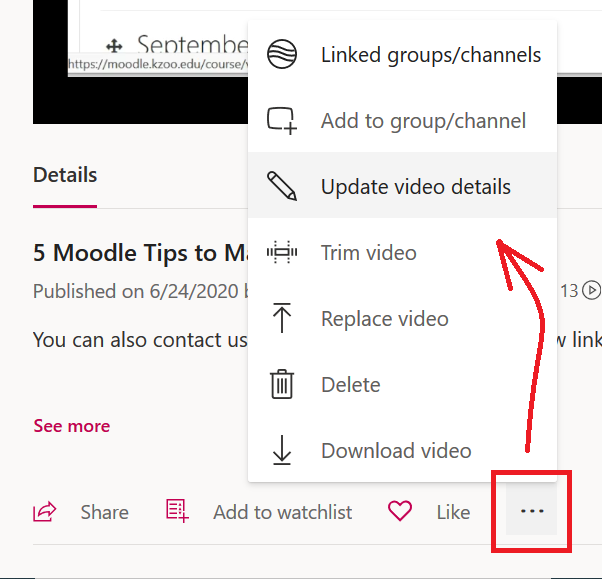
Once the recording is complete, go back to More Actions and quit the recording. The video will automatically begin uploading to Microsoft Stream as part of our Microsoft integration. Stream will take time (minutes, not hours) to fully process the video depending on the size. The participant who clicked the recording option will have access first, while other members will wait for processing. In order to extend access to an instructor or another recipient, the participant who started the recording will need to “Update video details” and access the Permissions in Stream. Choose individuals to grant access to and empower other participants as owners if necessary. If the student uploaded their own video, this is where they can share it with group members and instructors as well. For more information, please watch Giving Permission to View a Private Video on Stream on the Tech Talk channel.
Now that these individuals have access, that same participant can use the Email feature to share the video directly to the email of the instructor or other recipients. Note: sending an email or creating an embed will not expand who can access the video. That must be done in the Permissions.
It is easy (intentionally or otherwise) to have Microsoft Stream allow everyone in the College to access a video. With these steps, students should be able to use Teams and Stream to complete a video project, share it with select individuals, and limit the access to others. With video being so popular in online learning and collaboration, we hope this answers some question on how to execute such a project.
Everybody at the College has access to a suite of Microsoft programs. Among them is a video sharing platform called Stream. The built-in capabilities of that program make it the easiest way I’ve found to record a video lecture that includes a picture-in-picture webcam video of you presenting the lecture. The one limitation to be aware of: the platform has a limit of 15 minutes for these kinds of recordings. That isn’t a problem in my view/ A prepared video lecture can get your message across in that time, and students report that longer video lectures are hard to digest. Below is a quick 5-minute video that shows the process from beginning to end.
An important note: The steps below work in the Teams App on my machine running in Windows 10. We’ve come to realize that different operating systems have different features and behavior. If you have a Mac, Chromebook, or use the browser-based Teams site, please let everyone know how/if this works for you in the comments below. Thanks!
There are lots of solutions for recording video lectures that include your webcam image. Here’s one that doesn’t require any extra software. We’ll use the Microsoft programs Teams and Stream, both of which are available free to every member of the K community, to record a video lecture about recording video lectures!
A 4.5 minute video about recording a video lecture in Teams
The key things you’ll need to do:
Select “Meet now” to start a call in your Team, but don’t invite any other participants. Please note that the “Meet Now” button has moved to the upper right corner of the Teams window.
“Share screen” if you want to include PowerPoint or other content in the recording
Record the call using the three dots menu …
When you select stop recording, your recorded lecture will appear immediately at your MS Stream site. Even if you’ve never used Stream, you have an account already set up through the K College Microsoft suite of programs. Click here to learn more about Stream.
Trim the beginning and end of the recording in Stream for a more polished final product.
Copy the link from Stream to include in your Moodle site for students to access the recording.
In this post, I share how I used channels in Microsoft Teams to create small groups similar to Zoom breakout rooms, in which students can meet to work on a task and the instructor can “drop in” and move between groups during synchronous class sessions.
In my classroom (the one with tables and chairs), the hour is usually spent alternating between small-group or pair activities and large-group follow-up. Language instructors want nearly 100% of the class time to be spent in the target language, and we want students to be using the language actively as much as possible. Students speak and listen to one another, or they write together, communicating about a topic and thinking about how to express themselves and make themselves understood. The smaller the group, the more speaking time for each student. After setting up an activity, I usually move around the classroom to help students, and turn on a dime when I hear a group across the room that maybe misunderstood the task, or thought I was out of earshot and just slipped back into English.
In March, when I thought about how to adapt my spring courses (German 201 and German 470) to an online format, creating small groups for synchronous video meetings was one of my biggest priorities. For those of us who had experience with Zoom, the lack of a breakout room function in Teams was a problem. In this post, I share how I used channels in Microsoft Teams to create small groups similar to Zoom breakout rooms, in which students can meet to work on a task and the instructor can “drop in” and move between groups during synchronous class sessions.
Although there were of course mishaps along the way, the students and I got used to the rhythm of moving between large and small group work and in the end it worked fairly well. In my course feedback, students responded positively to this setup: “we did a lot of partner/group work which was helpful in improving my collaborative thinking skills”; “the small groups were useful in practicing speaking and writing in a smaller environment”; “The balance between large class meetings, small group meetings, and individual work was pretty good.” I can imagine how using small groups in Teams would be useful for many kinds of group or pair assignments in other disciplines.
Using Channels for Small Groups
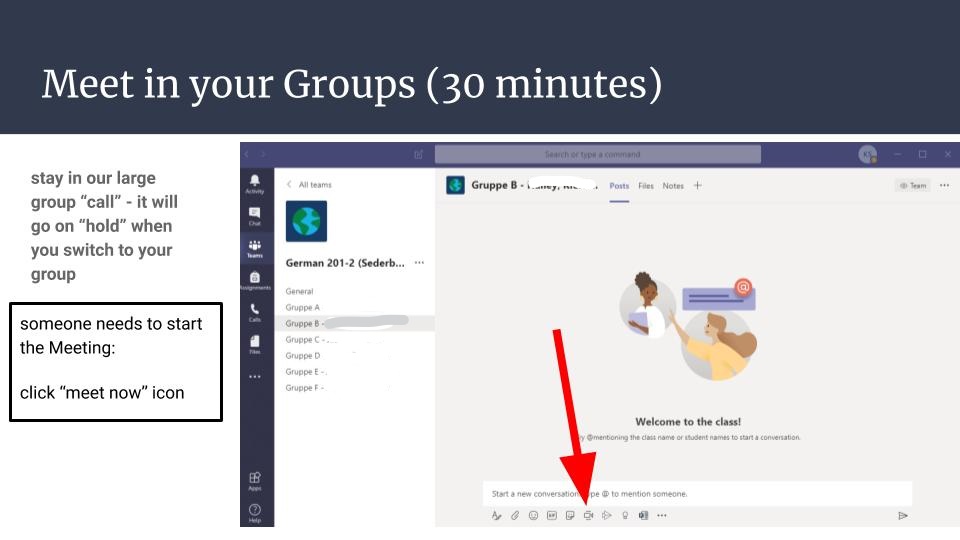
Microsoft Teams allows users to create channels within their teams, and from within a channel you can easily click on the “Meet now” button in the bottom toolbar to start a group call (with or without video). You can have more than one call going on simultaneously in a team, and as an instructor you can see who is meeting in each call, the duration of the call, and you can join and leave these calls. Students can also record their meetings. There is a chat associated with each channel and with each call/meeting.
In a typical class session, I would begin class by starting a video call in the “General” team channel. I would make small talk with students, take attendance, and do a warm-up activity and perhaps some review. Then at some point I give students a task to work on in small groups. For German 201, I created six small groups with 3 students each, and in German 470 I created groups of 3-5 students. While students are working in their small groups, I could leave the general call on “hold” and toggle over to “visit” the small groups by clicking on the channel names on the left sidebar and on “join meeting” from each channel chat. In this way, I could usually visit all groups during the hour. At the end of the scheduled group work time, students meet back up in the general meeting, which was left “on hold.”
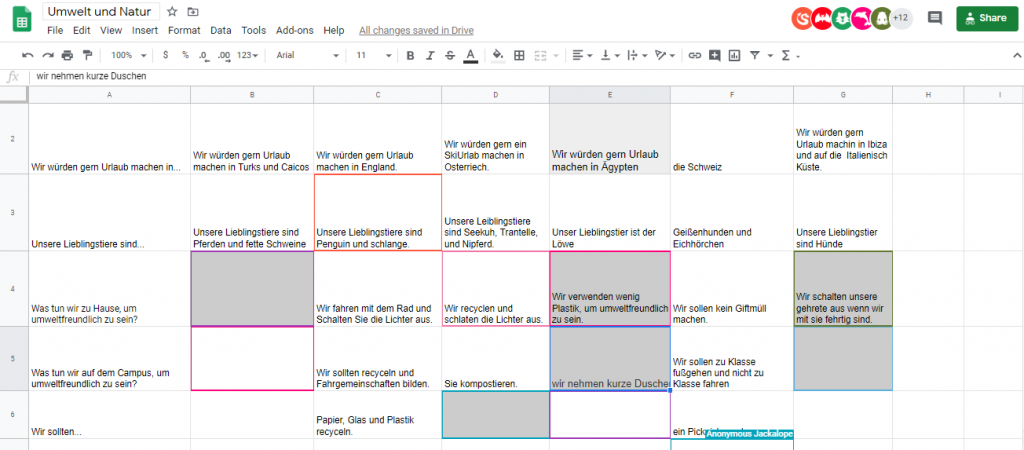
I found that it is important to create a clear and specific task (“Work through this set of 5 questions”) with a time limit (“Meet back in the main group in 30 minutes, at 10:30”), and to somehow hold students accountable for the work (“Designate one person to take notes”). I also found that the combination of Teams for small group video calls and collaborative, real-time documents like Google Docs or Google Sheets helped to hold students accountable for the work and allowed me to watch their progress in real time and check in with the students who needed assistance. For example, my intermediate German students asked each other questions related to our topic “nature and the environment,” and recorded their answers in a Google Sheet. I could see immediately how far the groups were in the activity, who needed help, and what grammar and vocabulary I needed to review with the whole class. In my upper-level seminar, to provide another example, students worked together in small groups on a Google Doc to summarize an article they had read, to write discussion questions based on a text, or to write a film review.
How to set up channels in your team:
Open your class team by clicking on the “Teams” icon on the left sidebar and selecting your class.
Next to the name of the team, click on the “…” button and then “Add channel.” Give your channel a name that includes the names of the students, for example: “Group 1 – Max, Ben, Sarah.” This enables students to easily see which group they are in. Leave the default Privacy setting (Standard – Accessible to everyone). Important: click the box that says “Automatically show this channel in everyone’s channel list.”
Continue to add channels for all groups following the instructions above
You may also click on the “…” icon next to your Team name, and then on “Manage Team” / “Channels”. This allows you to select/unselect the boxes for “Show for me” and “Show for Members” and to delete channels
For my 400-level German class, I set up small groups that I changed every two weeks, mixing the students randomly. I found that students wanted a more stable group so they could get to know their small group members and 2 weeks was about right, because they also wanted variety and to get to work with different students in the class. In my 200-level German class, I changed the groups every week because they were smaller and the groups met more frequently. When you change up groups, you have the option to delete the old channels and thus their chat/call history (what I did), or you could also just re-title the channels with the names of new group members.
I also learned the hard way that if you click on “hide” under the channel options, the channel only disappears from view on your team, not for all members. I had a student screen share and was horrified that they had a list of 10+ different channels on the left sidebar – a confusing mess of old channels I thought I had “hidden” and thus cleaned up. You can manage channels that are shown by clicking “Manage team” / “Channels.”
Summary and Tips:
Use channels in Microsoft Teams to create small groups.
Students can video call in small groups and the instructor may join and leave calls
You can have multiple video calls (meetings) going on at the same time within a team. You can leave the main (general) call “on hold” as a place for students to return to after their group meets
Be clear about how long students should meet in their group, and assign someone to keep an eye on the clock
Ask students how often they want to switch up small groups. You want to allow students to get to know their small groups, but also work with different students in class.
Use collaborative documents (Google Docs, Sheets) to see students work together in real-time and give feedback.
Teams allows you to view video for up to 9 users. If you create groups larger than 8, some students will be able to “hide.”
I want to end this post with a round of applause for Josh Moon and a huge thanks for all his help in supporting faculty over the past few months. Danke, Josh!