
We’ve heard many requests to help students submit video content to their instructors with College resources. Microsoft Stream provides a place for students to upload large video files and control who has access to them. Think of it as a private, Kalamazoo College YouTube where you pick who gets to see your videos. Click here to learn more about Stream.
First, let’s talk about making the videos. If students are creating a video elsewhere, like in an editing lab or on their personal device, they can upload a pre-made video to Stream. To do this, one member has to log in to Microsoft Stream and upload the video. We’ll talk about sharing that video with others in a moment.

Let’s assume they want to use Teams and a group Call to make the recording. This involves a few simple steps inside Teams. One group member can start a new Chat with two or more participants. Invite the participants and hit Enter.
- Once everyone is ready, click the Call button in the upper right.
- Have one participant initialize the recording by clicking More Actions… in the Menu
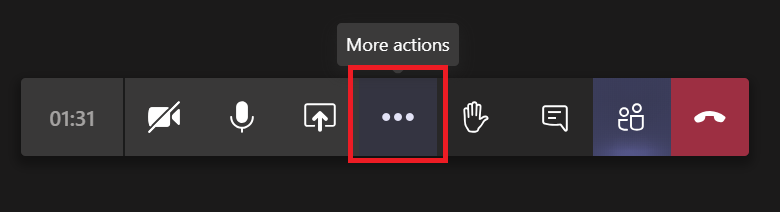
- Once the recording is complete, go back to More Actions and quit the recording.
The video will automatically begin uploading to Microsoft Stream as part of our Microsoft integration. Stream will take time (minutes, not hours) to fully process the video depending on the size. The participant who clicked the recording option will have access first, while other members will wait for processing.
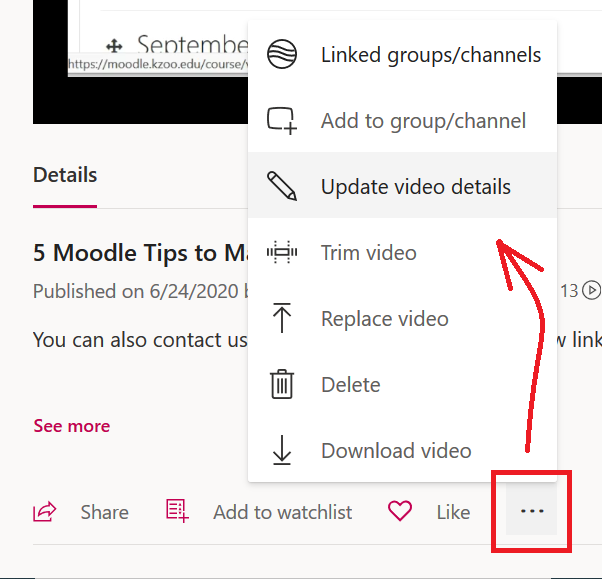
In order to extend access to an instructor or another recipient, the participant who started the recording will need to “Update video details” and access the Permissions in Stream. Choose individuals to grant access to and empower other participants as owners if necessary. If the student uploaded their own video, this is where they can share it with group members and instructors as well. For more information, please watch Giving Permission to View a Private Video on Stream on the Tech Talk channel.
Now that these individuals have access, that same participant can use the Email feature to share the video directly to the email of the instructor or other recipients. Note: sending an email or creating an embed will not expand who can access the video. That must be done in the Permissions.
It is easy (intentionally or otherwise) to have Microsoft Stream allow everyone in the College to access a video. With these steps, students should be able to use Teams and Stream to complete a video project, share it with select individuals, and limit the access to others. With video being so popular in online learning and collaboration, we hope this answers some question on how to execute such a project.