Use the new Bookings app to schedule advising meetings

Dearest Advisors, 

If you already use MS Outlook to manage your calendar, there’s a new app called Bookings available in our MS Office suite. Bookings allows students to sign up for meeting times based on your availability at Outlook. Here’s an 8-minute video screencast that shows the steps I used to set up my advising schedule. If you don’t have 8 minutes, scroll down for a few notes, obstacle warnings, and instructions from Josh Moon.  You can also take a look at his own Bookings calendar

Josh’s Notes:   

  • Bookings works best if you use Outlook and/or Teams to keep track of your calendar.  Bookings will sync and “talk” to those Microsoft Campus systems.  You can use it independently, but you’ll want a plan for managing your availability.  
  • Bookings and its language is optimized for organizations and groups with multiple staff members, but an individual can also use it to let people book time on their calendar.  There are faculty and staff already using it successfully in this manner.   
  • If you select the default Availability setting, appointments will be available whenever you are free on your calendar. You can further limit this by introducing “Custom hours” in the General Availability settings.   You can also set a different availability over a particular date range, for example during Advising Week.   
  • “Services” can be 1-on-1 or Group.  However, “Group” means that multiple separate individuals can access the same time slot, as in for a webinar or training.  If you want only one person or even one group to access a single time, choose 1-on-1.   Once you have a “Group” service, you cannot change it to 1-on-1!  
  • If you want the cost information to be omitted from your page all together, select “Price not set” instead of “Free.”   
  • The default scheduling page will ask for the person’s name, email, address, and phone number. You can remove and add fields as you like.  For example, you might create an option to pick between a Teams and in-person meeting.    

 
Bookings Steps for Advising Week Meetings:  

  1. Log in to Office.com  
  1. Select Bookings from the Apps.  
  1. Create a Bookings calendar. 
  1. Add a “Service” for your advising schedule 
  1. Fill out the settings for your “Service”.    
  • Choose how long a default appointment should last and whether you want a buffer time.  
  • Example: Meetings of 25 minutes + a five-minute buffer after, and your available appointments will look like:   
  • 2:00 – 2:25pm 
  • 2:30 – 2:55pm 
  • 3:00 – 3:25pm, etc.   
  • Availability options  
  • For the general availability, choose “Not Bookable.” It’ll be okay!  
  • Then, “Set a different availability for a date range” and choose your window of dates.   
  • If you don’t want Bookings to allow appointments any time you are available, set more custom hours.   
  1. “Save changes”, then copy the link to the new service and share it with your advisees! 

Send a Moodle Message to students who haven’t submitted an assignment.

This morning I wanted to send a message to those students in my class who hadn’t yet submitted the first homework assignment at Moodle.

A little Googling led to this solution. It requires several steps, but I found it easy once I put it all together. You can see the process from start to finish in this 1-minute video, or scroll past it to see the step-by-step with screenshots.

Find your way to “Reports” and “Course Participation”

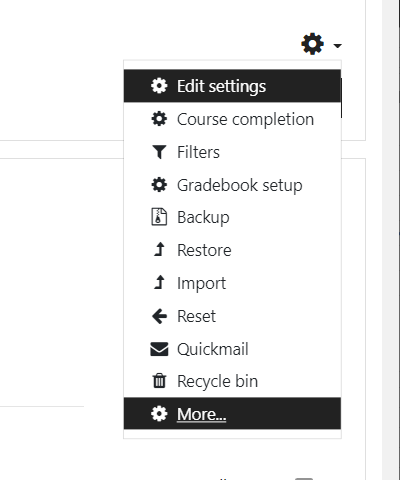
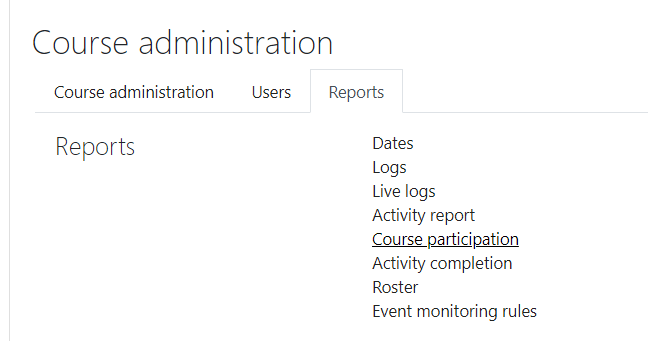
From the Gear Menu, Select "More" and then "Reports" finally "Course Administration".
From the Gear Menu, Select “More”
then “Reports” and finally “Course Administration”.

Select the activity and show “Post” actions

Select the activity from the dropdown menu, then specify 
 only Students, and show actions Post.  Hit Go
Select the activity from the dropdown menu, then specify
only Students, and show actions Post. Hit Go

Ask Moodle to find the students who haven’t submitted the activity

Scroll to the bottom and "select all No"
Scroll to the bottom and “select all No”

Select “Send a message”

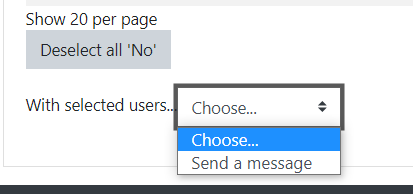
from the "With selected users..." menu, choose "Send a message"
from the “With selected users…” menu, choose “Send a message”
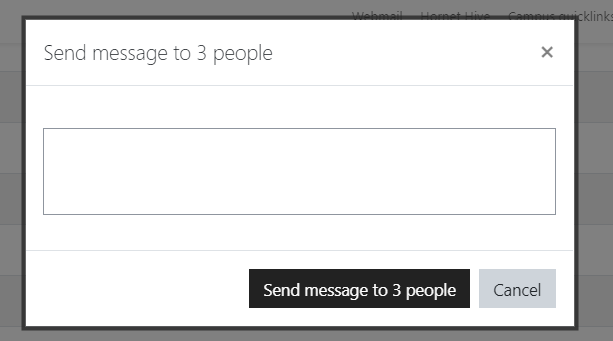
A text entry window pops up with a place to type the message.  Hit "Send"
A text entry window pops up with a place to type the message. Hit “Send”

This sends a message to students within Moodle. The students should also receive an email alert.

Putting the “Room” back in the classroom — Josh Moon

As we move toward the goal of a fall term at K that is “fully on campus”, people are in different places with their comfort, options, privilege, and vulnerabilities in spending more time in-person on campus. In some ways, the move back in to the classroom will be as fraught and uncomfortable as the exit. However, there is enough worth preserving that I hope we approach that goal with the same creativity and resolve. I reflect on my experience of in-person teaching this winter in this piece.

“Sometimes I Don’t Know What I Don’t Know Until I’m Taking the Test…” Rethinking the Midterm — Siu-Lan Tan

After attending Dr. Amer Ahmed’s faculty workshops on Intercultural Skills and Inclusive Pedagogy, I have become more aware of how the teacher is traditionally positioned as the “knower”, and students are expected to give as “perfect” as possible a “performance” of knowledge dispensed by professors and textbooks.

And I began to think about how our classrooms don’t always provide a space for not knowing – especially when our Class Calendar says it’s time for a Test or Term Paper, dictating when students are expected to “show how much you know.”

This is a simple exercise I added to the Midterm Discussion Exam for my Developmental Psychology course in Fall 2020 and am currently implementing again for two sections in Winter 2021. I didn’t administer the standard Blue-Book Essay Midterm as I had for 20+ years, as I wanted to find alternatives to written exams during online courses. This simple exercise assesses not only what students know, but what they do not understand yet (“fuzzy areas”) while taking a Test. (This was incorporated into a Discussion-style test but could be adapted for Written Tests and Papers).

Here’s how we did it:

  • I didn’t reveal to the students ahead of time that I was going to do something different. I gave them a Mid-quarter Study Guide, and simply wanted them to review and prepare the course material as best as they could.
  • I divided my class of 24 into four groups of 6 students. I met with each group for 100 minutes, with a 5-minute “stretch break”. (This took almost 7 half hours over the course of three days, but I didn’t hold synchronous classes that week).
  • Toward the beginning of the discussion, I asked each student to identify their favorite topic in our class so far, give examples of why it was intriguing – and then identify what was the “fuzziest area” about that topic?  (I tried to “normalize” having fuzzy areas, by saying something like “… because no matter how well we understand a topic, there’s always going to be something that’s a little murky or fuzzy, and not as clear as the rest”).

I didn’t know how it would go. Would they claim everything was pretty clear already? Would they be reluctant to reveal what they didn’t know during a Discussion Test? And how would this translate in an online situation, via MS Teams?

To my surprise, students were quick to point out “fuzzy areas” – especially after they had just had an opportunity to talk about their favorite topic, often with great enthusiasm and gusto.

  • In our small groups of six, I usually started with a student who seems comfortable talking in class, to set the tone. After the student identified a “fuzzy area,” I would empathize first, then probe: “Oh yes, I see others nodding. I remember needing more time to grasp that one. What about Bronfenbrenner’s ‘mesosystem’ is most fuzzy or confusing?”

“Well, I understand the definition is the linkages between microsystems, but it’s hard to totally see how it works.”

“Okay, let’s get some group help – and then I’ll clarify as well as I can. What about Robin’s question: Can anyone give an example that would illuminate this level of the model?”

  • Note:  I didn’t do the “group help” step the first time. Out of habit, I jumped straight from the student’s question to giving an explanation (and then invited add-ons from peers). I played “dispenser of knowledge” too soon and took some of the joy of collaborative discovery away. 

Adding this step allowed peers to scaffold each other (in their own language and with their own kinds of explanations) before I entered to summarize, clarify, and probe further. That way, students frequently credited peers for breakthroughs (“the example Megan gave really helped me get the concept”).

Another nice outcome of sharing “what I don’t yet know” in a group: some students later said it helped them realize that they weren’t the only ones that hadn’t grasped something – especially when they heard more confident students talk about “fuzzy areas.” This could be especially helpful for our first-generation college students, students of color, and students with special challenges; when not knowing is not kept a secret, it may help alleviate the loneliness of assuming you’re the only one that “didn’t get it”.

  • Structure/Time management:  I first posted all 6 students’ “fuzzy areas” to quickly plan a structure for our discussion — by grouping overlapping questions together, and deciding on a logical order to tackle them. I tried my best to include all students’ questions, folding in more tangential points into core concepts. This method made the best use of our time.

On most topics, students contributed helpful points to fill in the gaps, and there were some neat breakthroughs in each group. At the end of each round, I tried to provide a clear summary or synthesis (“So to sum up, we can understand the mesosystem as representing…”). When it came to me, I would add something new, with the hopes of continuing to teach and maybe even lead to another “aha” moment together. Often at the point of group discovery, there is a special readiness for another shift in thinking.

  • Although I implemented this simple exercise in Midterm Discussions, it could easily be adapted to Term Papers and (written) Tests. We might encourage students to fill in a box at the end of a paper or test where they can convey one or two “still fuzzy areas” or “what’s still coming together for me” (with a clear statement that this will not affect the grade). This can give us insight into what to review and reinforce in our next module.

I didn’t focus on “fuzzy areas” for the Final Discussion Exam, for which I targeted other learning goals. This was perfect for the Midterm, allowing me to fill in gaps and reinforce certain principles for the last month of the course. But many students spontaneously brought up “fuzzy areas” on their own during the Final (which we addressed together), having learned that our class was open to this!

The “take-aways”:

The “fuzzy areas” was only one portion of our group discussion, but when I asked students what they liked or learned most from our time together, most described a breakthrough from the “fuzzy areas” part. When I asked why this was helpful, many said it’s because it departs from the standard way we test – with an approach that seems intended to assess what they “know”, and “catch” what they did not study well, or did not fully grasp. As one student put it, “at that point it’s to judge it and not to teach it.” 

Many times, when we introduce a new concept in class, and stop to invite questions, no hands go up. It is only later, as students are pulling together all the information to prepare for a test – or actually taking the test – that they see where their understanding is incomplete. If we provide a safe space, somewhere in our spoken or written tests and papers, to convey those “fuzzy areas” and address them, the test is not just the measure of one’s learning but a tool for further learning.

As one student put it:

“Sometimes I don’t know what I don’t know till I’m taking the test, and then it’s too late… I really liked this discussion test, because you asked us to talk about the fuzzy parts, so we could close the gaps.”

-Siu-Lan Tan

My Favorite Online Teaching Tool: Google Jamboard — Kathryn Sederberg

I know, I know…you’ve heard about a million different tech tools to be used for online teaching –and you’re overwhelmed. But I promise you, this one is worth checking out. It’s called Jamboard, and it’s a Google collaborative tool like Google Docs or Slides. Jamboard is basically a fancy digital whiteboard. Share your screen, and you can write terms, draw, share images, and share text. If you share the link, students can add post-it notes (anonymously!). You can also add images from the internet or from your computer to be annotated.  Jamboard is also a great way to structure small group work, and observe how students are doing in real time.

There are many ways to use this tool. Dwight Williams already wrote about using Jamboard for Whiteboarding with Organic Chemistry students. I have used Jamboard in my first-year seminar to get discussion started, or to guide group activities. For example, students brainstormed initial ideas based on the reading by adding “sticky notes.” We also workshopped “what makes a good thesis statement” – students posted their thesis anonymously and we talked through and then edited them together. In German class, I have posted images and had students brainstorm vocabulary, or collaborate to write stories together.  

Here is another sample from my seminar (Link to Jamboard), for how to use Jamboard to structure small-group discussion. Each slide had either a discussion question based on the reading, or a blank slide that asked students to answer the question with a sticky note.

There are many templates you can find online (eg, by Kris Szajner for “Ditch that Textbook”), or it is very easy to create your own Jamboards from scratch.

Tips/Lessons Learned

  • You can make the Jamboard view-only (similar to Google Slides) if you want to present; or you can give students editing privileges for collaboration.
  • There is no revision history or way to “revert” to original. If you are giving students the link and editing privileges, you may want to save a backup if you plan to re-use the Jamboard.
  • It is very easy to “duplicate” slides and to copy the presentation. For group work, you may want to give each group their own slide to edit, or you may want to copy the whole Jamboard and give it to different groups. I have found it also works well for students to go through the Jamboard at their own pace, with different discussion questions on each slide.
  • Take advantage of the anonymity, or allow students to write their name on a post-it. I mostly used the anonymous posting tool in my classes.

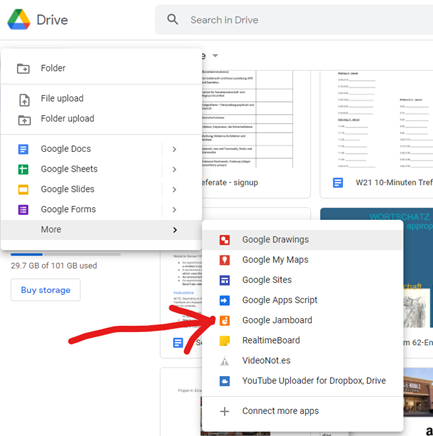
How to find Google Jamboard via Google Drive (it’s under “More” below Docs, Sheets, Slides, and Forms):

Further inspiration/links:

  • John Sowash, 5 Simple Jamboard Lessons (I especially love the examples of the “brain dump” and “annotation station” here)

Feminist Pedagogy Online: Lessons from Fall 2020 and Practices for Winter 2021 — Anne Marie Butler

From a pedagogical perspective, I am primarily influenced by practices of feminist pedagogy such as knowledge co-creation, empowerment, and community building. These three tenets each serve to deconstruct the professor/student hierarchy and have also become particularly important for my online teaching. In my classes, we begin with the recognition that each person, including the professor, experiences different privileges and oppressions and that these positionalities shape our perspectives on the world, and what we bring into the classroom. On the first day of class, I have the students break into groups to chat about engaging in respectful discussions surrounding difficult topics, and while online. We develop our guidelines as a class, thereby setting a tone of a less hierarchical classroom. Allowing the students to set guidelines on the first day signals to them that their voices are important and influential in the classroom. It also allows them to meet their classmates and to feel more comfortable speaking. Since enacting this practice, I have observed that students are much more confident speaking in class, and they are ready to speak immediately following the first day of class, whether in large or small groups. This first day exercise effectively removes the “awkward” period that a class sometimes needs before the students can trust one another and the professor enough to feel comfortable contributing. Particularly in the online setting, I have found that this exercise encourages them to recognize that they are all in the same “online boat,” so to speak, and that they share the experience of adapting to being online. This immediate commonality gives them a shared experience from which to build relationships and community.

Another way that I build community and empowerment, particularly across physical separation, is “check-ins.” I began these check-ins in the Fall 2020 quarter. At the beginning of each class, five minutes is set aside for students to check-in about how they are feeling. They can ask questions, talk about successes or challenges, or share something about their lives. Sometimes I leave it open to them, and sometimes I present a prompt, such as, “think of one thing you are proud of yourself for doing in the past week. It can be large or small, it could be as small as completing that household task you’ve been putting off, it could be as big as finishing that paper or having a difficult conversation with someone.” Then I ask if anyone would like to share their thoughts. I chose this example to write about specifically because the “thing you are proud of” check-in serves a purpose in addition to building community: it requires the students to actively think positively about themselves and to engage in a self-reflection that increases their self-esteem. It allows them to practice an exercise that has an immediate, positive effect on their mood. I felt that this empowerment was particularly significant in an online format in which students experience challenges beyond those of an in-person quarter, namely separation from peers and community, plus additional stresses, all of which may impact mental health.

I also use different models of experiential learning to allow students to direct their own learning. One such activity is group work. My pedagogical goals for group work are 1. To have the students teach each other and work through problems together, thereby enacting knowledge co-creation, and 2. To enable the students to build communities. Due to running classes online, I had to be more thoughtful when constructing group work activities and assessments. I’ve found that this has actually given me the opportunity to develop more specific goals and assessments for group work. In my classes, students are assigned to groups of four to five students for three-week sessions. Students work in their small groups typically every other class meeting. During small group, they complete a variety of guided exercises that I have developed related to the materials. I frequently pop-in to their breakout sessions to observe them and to offer myself as a resource to answer any questions that have come up in their discussion. They are also able to call me in to their breakout session by chatting me. After every three-week rotation, students must submit an evaluation sheet on which they are given a rubric for evaluating their peers and themselves (sample below). A recent change I have made for the Winter 2021 quarter is that providing thoughtful comments as well as a score is tied to each student’s own final score for that period (sample below). This should assure that I receive more evaluation sheets with comments and without having to remind students to submit them. You may notice that my own observations and score are weighted less than their peer scores in terms of their overall grade. I am again signaling a move away from the hierarchy of the professor-centered classroom and towards a recognition that myself and the students are partners in their education and assessment.

One final aspect of Fall 2020 that I will carry into Winter 2021 is something I learned from my students. About halfway through the fall quarter, I became concerned that three synchronous meetings each week, effectively the same schedule as in-person class meetings, was too taxing for the students given the virtual circumstances. I didn’t know if this was helping them, or too much for them. I asked them. They overwhelmingly expressed something that surprised me: they loved synchronous meetings. They said that because their lives are so restricted right now, in terms of where they can go, who they can see, what they can experience, that their days blend together. They could sleep until the afternoon, or they could get up and feel lost because they are undirected about where to start. They explained that synchronous class meetings give them a purpose to the day, a commitment of a place and time to show up, and a schedule for which they feel responsible. They told me that they need this structure, and that they were so happy my class provided it.

The best lesson I have learned is to continuously react, rethink, and adapt. Best wishes to everyone in the Winter 2021 quarter.

Sample Group Work Peer Evaluation Sheet

Instructions: Complete this form and turn it in to the assignment upload on Moodle by the Monday after groups switch (Mondays Week 4, Week 7, Friday Week 10). Your peer feedback is anonymous.

Give a score and comments for each group member, including yourself. Score as objectively as possible. Remember that your points for group work are factored in part by completing this sheet and giving reflective comments on how your peers and group worked together.

Your name: _____________________________ Group: __________

Points
Between 15 and 17 points. Give this score if your peer went above and beyond your expectations for contribution to group work.
Between 12-14 points. Give this score if your peer did what was expected of them in contributing to the group.
Between 9-11 points. Give this score if your peer did more or less what was expected but required some management from other group members and/or did not exactly meet expectations in that or other ways.
Between 6-8 points. Give this score if your peer under-contributed to the group, did not meet expectations, or otherwise prevented the rest of the team members and the overall group from achieving their best work.
0-5 points. Give this score if your peer was entirely absent, non-communicative, or for other circumstances that warrant a poor score. 

Peer name: ____________________________________

Points: ______

Comments:

Self-evaluation:

Points:____________

Comments:

Sample Group Work Rubric for Individual Scoring

***Although I have to give points in order to grade your assignments because I must give you a letter grade at the end of the quarter, I encourage you to think of these scores not as concrete evaluations of your abilities, but as opportunities for learning and growth.

Submit peer feedback sheet with scores and written feedback for all group members and self (6 points possible)   
Average peer evaluation (17 points possible)   
Instructor evaluation based on observation, peer comments, and student self-assessment (10 points possible) 

Asynchronous Lecture “Viewing Parties” with TwoSeven — Santiago Salinas

A terrible movie called “Click” came out ~15 years ago. The whole plot revolved around Adam Sandler discovering a remote control that allowed him to pause or fast forward real life. As someone who spills coffee and instinctively makes finger movements to hit the ‘command’ and ‘z’ keys (control-Z for PCers), I’ve always wanted that remote. This tool may be the closest we’ll ever get.

The website is called twoseven (twoseven.xyz). It allows people to watch videos together, synced, while texting or video-chatting, and it’s one of the more straight-forward and free options I’ve tried. You provide the site with a link to the video (e.g., lecture), your friends with a link to join you on twoseven, and that’s it.

Why was I looking for that kind of tool? Well, I like classrooms that are just a tad loud and all over the place. I ask questions and stop for a minute or two until students think of answers. I encourage interactions among students if they don’t disrupt others. I enjoy when students make nerdy jokes about vertebrates. I was looking for a way to simulate that communal feeling while my young biologists were watching lecture videos.

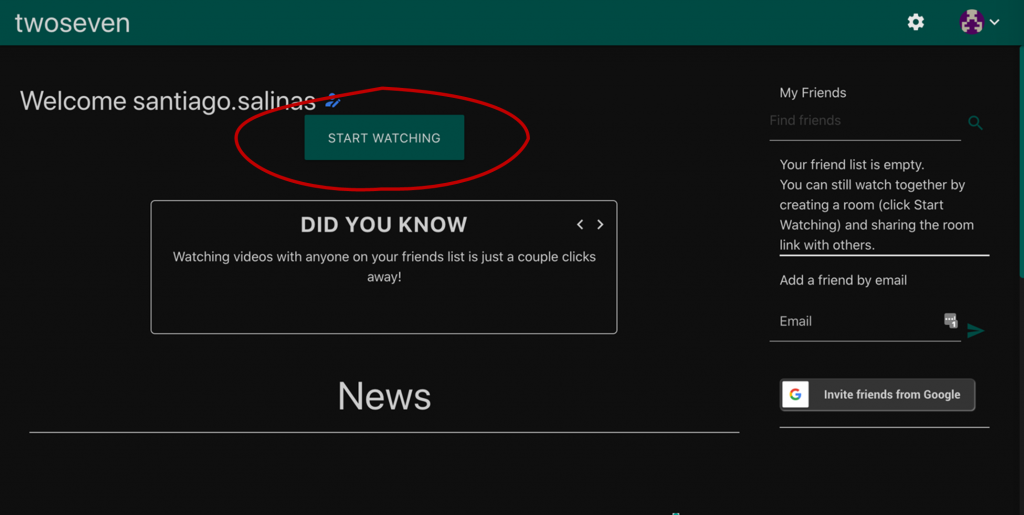
1. After creating an account, go to “Start Watching”

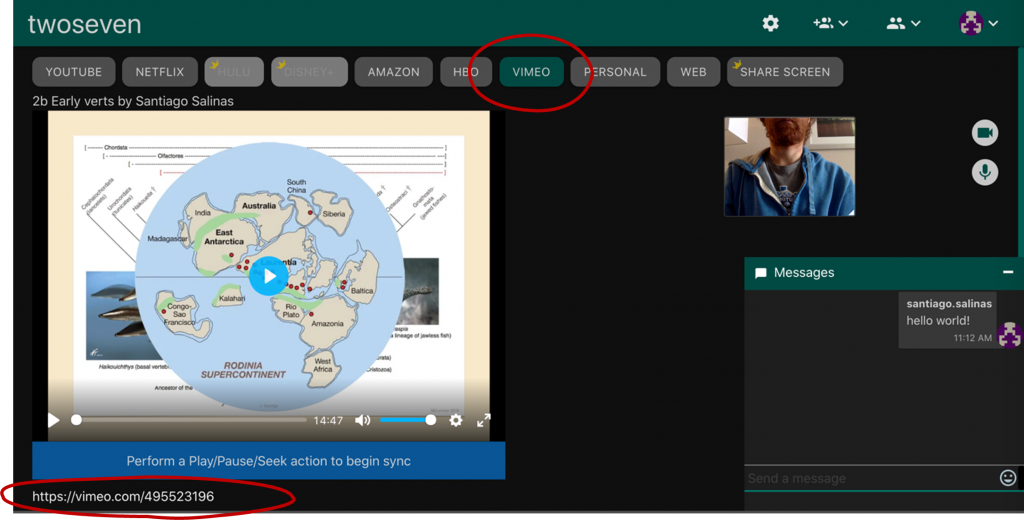
2. Make sure you have the right source selected at the top (e.g., Vimeo) and enter your link address

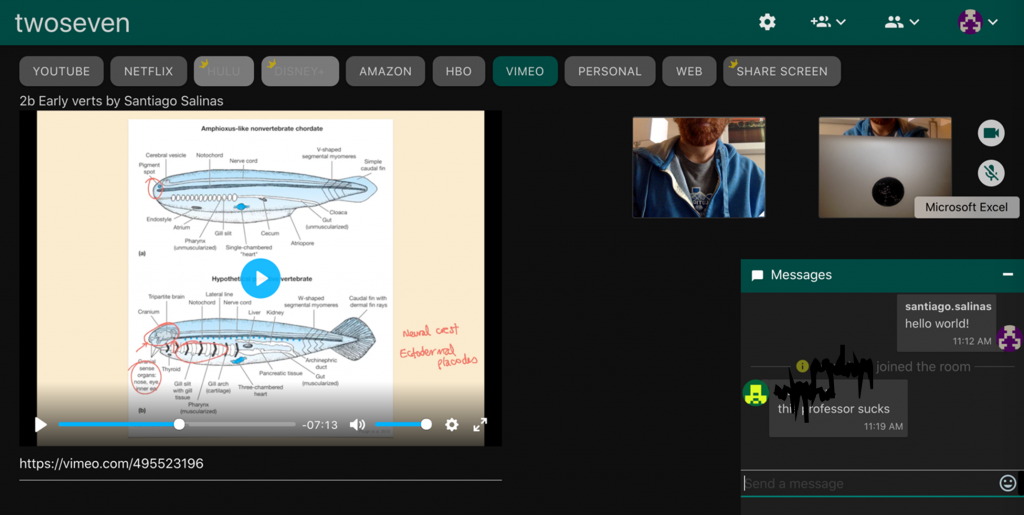
3. To invite others, all you do is get a link and share it

4. You are now ready to watch a lecture and pass virtual papers to your neighbors with the chat function!