In my communication workflow in this crazy online era, I have realized that I can often avoid a wordy description with a picture:
- A formula or figure from some online source
- A little piece of the student’s online submitted work I’d like to comment on specifically
- A funny meme 🙂
I can make that happen with a screenshot. Often I just need to paste the result into a Teams chat (sorry, Zoom doesn’t allow that), an email, or a PowerPoint slide. I can also save the screenshot to an image file to use later. The process is easy for both macOS and Windows10.
Windows10
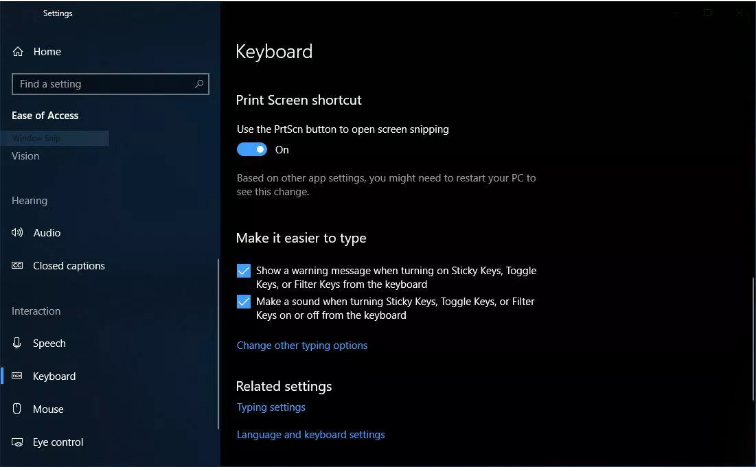
There are many ways to accomplish screenshots in Windows10. The slickest in my opinion is to flip a switch in Settings that allows the “Snip & Sketch” tool to be activated by the Print Screen button on your keyboard. You do this by going to the windows menu (lower left of you screen), selecting Settings (the gear icon) and searching for “print screen”. There’s a switch to flip: “use the PrtScn button to open screen snipping” as in the screenshot below.

Once you’ve done that, press the Print Screen button and you’ll see the screen become a little bit greyer and a few buttons appear at the top center, allowing you to copy a rectangular region, a window, the whole screen. It remembers your selection the next time too.

After you’ve made your screen shot, its ready to paste (CTRL V) wherever you want. Also, a little window opens in the bottom right of the screen. Clicking on that allows you to save the screenshot in a file, open it to edit, and a few other things.
macOS
There’s not much to say here. Push these three buttons simultaneously and the cursor will turn into a little crosshair that you can drag on the screen to get the rectangle you want to grab.

Here’s a webpage that goes into detail about screenshots on lots of devices.
